Cart is empty.
.png)


Internet/Ethernet 16 Relay Board - IP, SNMP, Web, Home Automation with DAEnetIP2

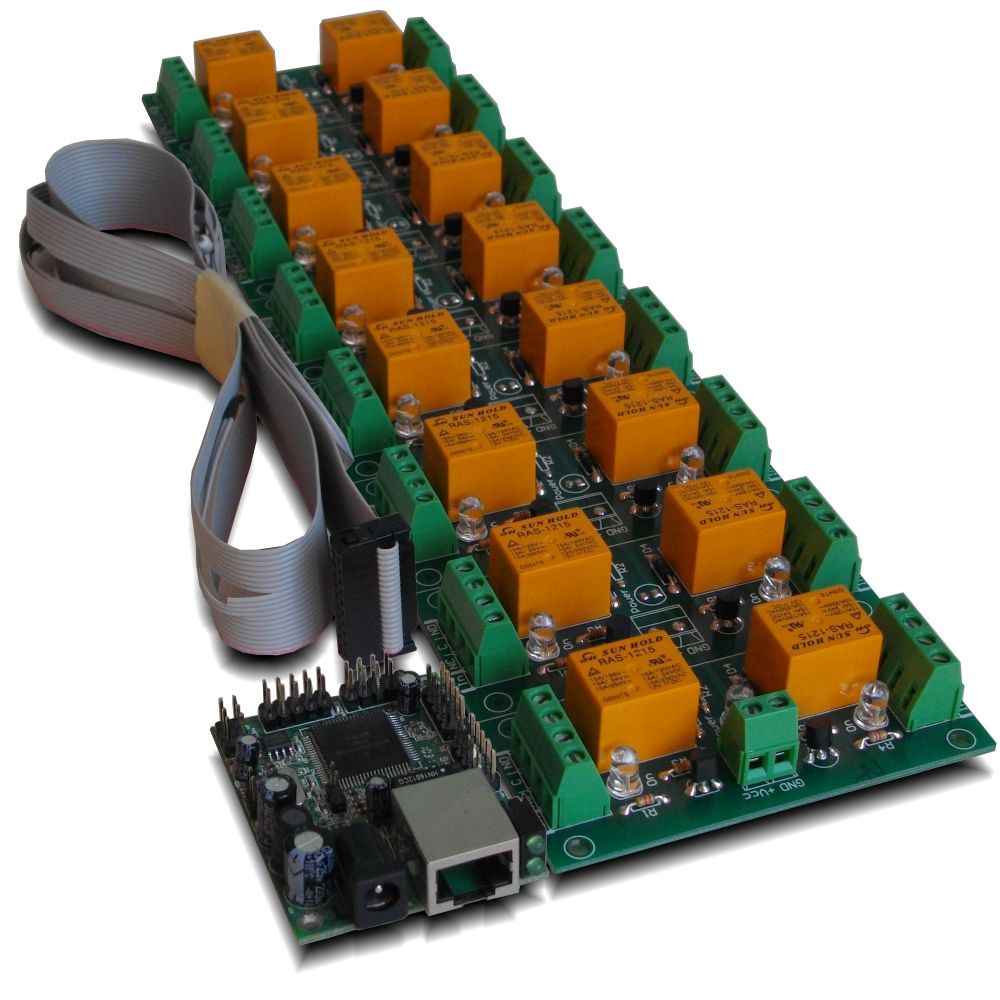

IP relay board with 16 SPDT relays (up to 15A each). Additionaly 8 analog inputs are avilable for various sensors. You can connect the board localy or via Internet and control it via computer software, web browser, command line, android mobile device. Easy to integrate in your code with our software examples. Supported by DRMv3 software. Works with Home Assistant, Domoticz and OpenHAB home automation systems as well as with Node-RED IoT platform. Now with FREE Android and iOS App!
Rating:

- Brand: Denkovi Assembly Electronics ltd.
- Weight: 0.482 Kgs
Code: DAEnetIP2 + DAE-RB/Ro16-12V
General description
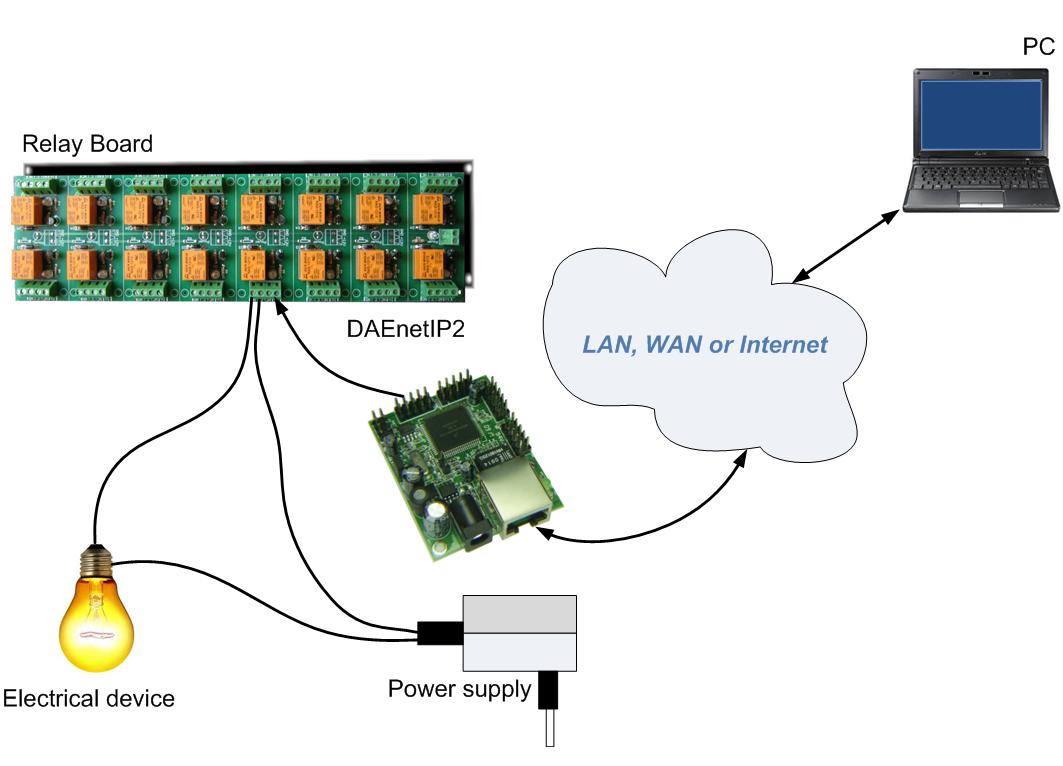
This is kit of IP controler and card with 16 SPDT relays. It is for home automation, hobby and commercial projects. It allows you controlling electrical devices via LAN/WAN (Internet). Just connect the device into your local network and control it from another computer or android smartphone over the LAN or Internet. This IP relay board can be controlled from: Configuration utility - DAEnetIP2 Manager, web browser, command line, android smartphone application or Denkovi Relay Manager Software. We can provide also software examples for developers.
Feauters
- 10/100 Mb Ethernet interface with Link/Activity Led (for DAEnetIP2 rev2)
- Power supply requirements (No protection against overvoltage and inverse polarity) - selectable during purchase
- 12V DC / 600mA
- 24V DC / 400mA
- 16 SPDT relay channels (the type depends on the stocks quantity in our store):
- TONGLING - JQC-3FF-S-Z (10A / 250VAC, 15A / 120VAC, 10A / 28VDC)
- SUNHOLD - RAS xx15 (10A / 250VAC, 15A / 120VAC, 15A / 24VDC)
- 8 analog inputs with 10 bit resolution (0-3.3VDC)
- 16 (2x8) bit configurable digital I/O port (0-3.3VDC) - in this kit they are reserved for the relay board
- Dimensions: Relay PCB - 85mm / 300mm / 20mm; DAEnetIP2 - 43mm / 55mm / 15mm
- Standart protocols: ARP, IP, ICMP (ping), DHCP
- Supports snmp v1 (snmpset, snmpget, snmptrap), HTTP (integrated web server with autorization) , TFTP (for firmware upgrade)
- Ports for SNMP (161) and HTTP (80) can be changed
- Two MAC addresses protection
- It can be configured with SNMP requests or web browser
- Integrated WEB server for all functions/parameters access. I/O lines labels can be changed via browser
- HTTP API commands for getting/setting the I/O states (with basic access authentication)
- Reset of the relays on incoming/outgoing ping timeout (watchdog function)
- Function "load outputs(relays) states from EEPROM on boot"
- Each I/O line can be named by user via web browser
- It can send traps according analog ADC level
- Analog Inputs may be referred to control the relay according their level
- Possibility of connection analog sensors to the analog inputs as LM34DZ, LM35DZ, LM335, MCP9700A
- Relay PCB parameters: FR4 / 1.5mm / two layers / metallized holes / HAL / white stamp / solder mask / Extra PCB openings for better voltage isolation / Doubled PCB tracks for better voltage isolation
- Software by Denkovi - DRM Software (Windows/Linux), DAEnetIP2 Configuration utility, DAE-iModules App for iOS, DAE-aModules App for Android;
- Supported by DRMv3 Software - New;
- Third party software - more info here;
- Supported by openHAB home automation software;
- Supported by Domoticz home automation software;
- Supported by Node-RED IoT platform;
- Software examples for PHP, JAVA, .NET and NI LabView - here;
- For detailed user manual - please contact us for download
Application examples
- Security and fire alarm systems
- Manual or automatic device restart if event occur
- Management/monitoring for industrial
- Sensor information processing
- Remote Lock/unlock doors
- Home automation
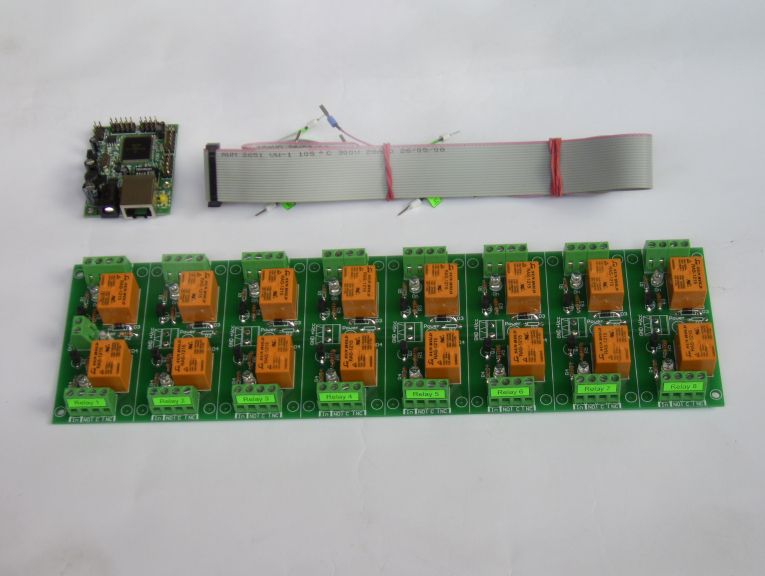
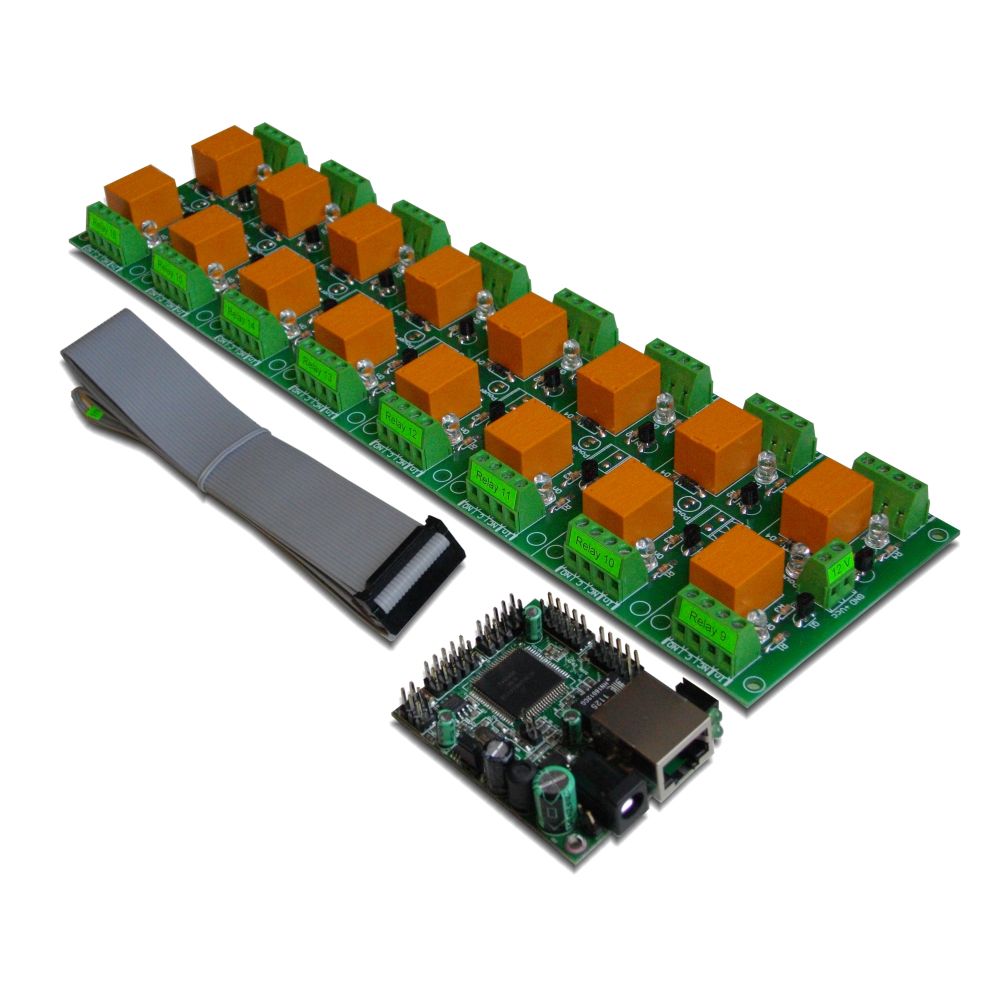
The kit includes
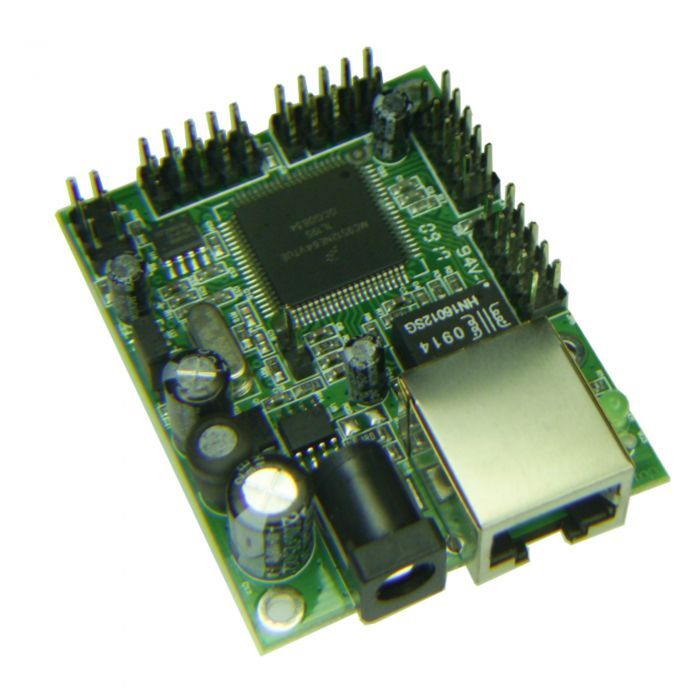
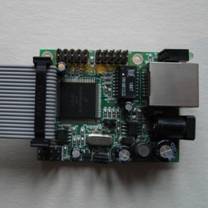
- IP controller (Ethernet controller) - DAEnetIP2
- 16 Output Channel SPDT Relay Board (Supply voltage is selectable during purchase: 12VDC or 24VDC)
- Flat ribbon labeled cabel
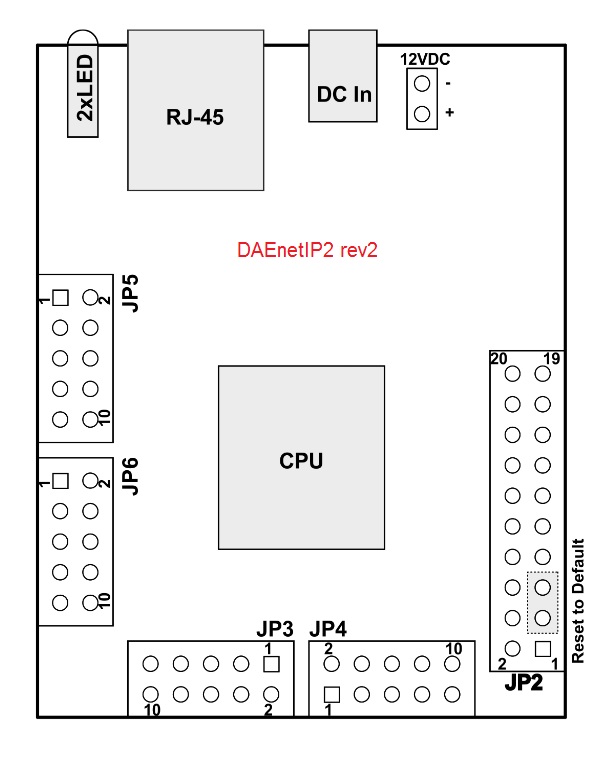
DAEnetIP2 I/O ports
 |
|
Port JP3 (P3)
|
Port JP4 (P5)
|
Port JP5 (P6)
|
Port JP6 (System Port)
|
||||||||
|
PIN #
|
Bit
|
FUNC
|
DIR
|
Bit
|
FUNC
|
DIR
|
Bit
|
FUNC
|
DIR
|
Bit
|
FUNC
|
DIR
|
|
|
1
|
1
|
Free
|
I/O
|
1
|
Free
|
I/O
|
1
|
Free
|
Ain
|
-
|
3.3V
|
PWR
|
|
|
2
|
2
|
Free
|
I/O
|
2
|
Free
|
I/O
|
2
|
Free
|
Ain
|
-
|
3.3V
|
PWR
|
|
|
3
|
3
|
Free
|
I/O
|
3
|
Free
|
I/O
|
3
|
Free
|
Ain
|
-
|
Reserved
|
-
|
|
|
4
|
4
|
Free
|
I/O
|
4
|
Free
|
I/O
|
4
|
Free
|
Ain
|
-
|
Ping LED
|
Out
|
|
|
5
|
5
|
Free
|
I/O
|
5
|
Free
|
I/O
|
5
|
Free
|
Ain
|
-
|
Reserved
|
-
|
|
|
6
|
6
|
Free
|
I/O
|
6
|
Free
|
I/O
|
6
|
Free
|
Ain
|
-
|
Target RST
|
Out
|
|
|
7
|
7
|
Free
|
I/O
|
7
|
Free
|
I/O
|
7
|
Free
|
Ain
|
-
|
Switch (RST)
|
Out
|
|
|
8
|
8
|
Free
|
I/O
|
8
|
Free
|
I/O
|
8
|
Free
|
Ain
|
-
|
Switch (SCL)
|
Out
|
|
|
9
|
-
|
GND
|
PWR
|
-
|
3.3V
|
PWR
|
-
|
Vref(+3.3V)
|
PWR
|
-
|
Switch(SDA)
|
In/Out
|
|
|
10
|
-
|
GND
|
PWR
|
-
|
GND
|
PWR
|
-
|
GND
|
PWR
|
-
|
GND
|
PWR
|
|
Legend:
| "Free" - the pizn is free and defined for the user. | "XXXXXX" - the pin is reserved | "In" - the pin is input | "I/O" – digital input or output depending the settings | "Out" - the pin is output | "Ain"– analog input |
All the DAEnetIP2 I/O ports does not have any protection against overvoltage or reversed polarity.
For inputs, if the input voltage exceed 3.3V, the controller may be damaged. If you have questions how to use the I/O ports please contact with us or take a look into the manual.
For inputs, if the input voltage exceed 3.3V, the controller may be damaged. If you have questions how to use the I/O ports please contact with us or take a look into the manual.
Installation
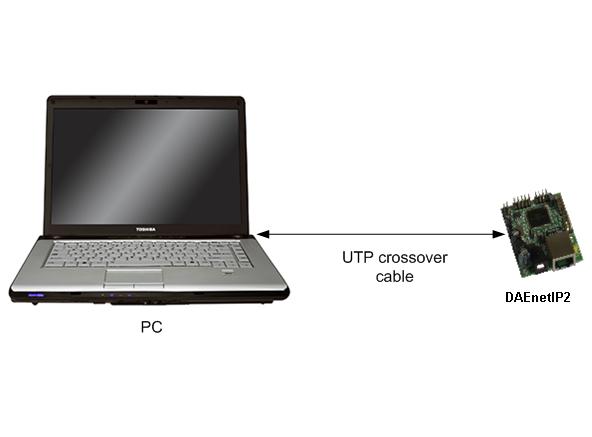
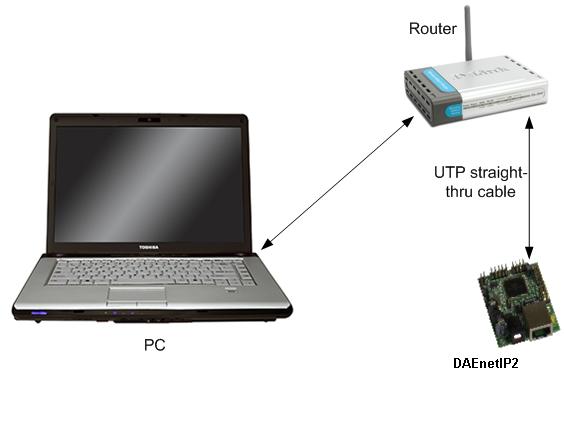
Here are the steps (instructions) how to power on and connect the device directly to your computer (see this image). For router LAN connection (see this image) or Internet connection, please see in the user manual:
|
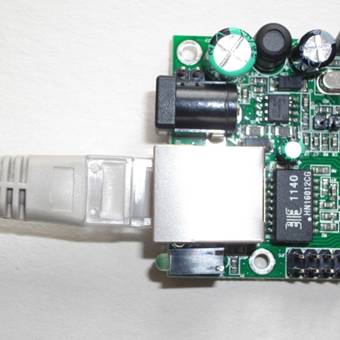
1.Connect the DAEnetIP2 controller with your computer via UTP crossover cable. (note that the device does not support AUTO MDIX).
|
 |
|
2.The flat ribbon cable connector must be fitted into to DAEnetIP2 IDC in this way
|
 |
|
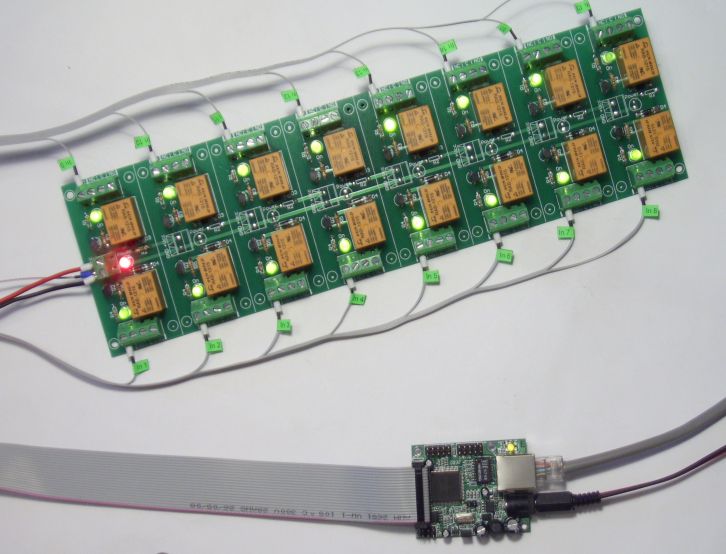
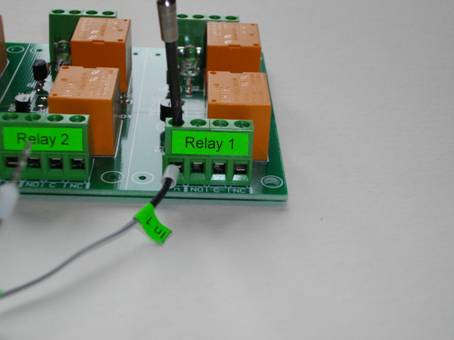
3.Connect each "In" labeled wire into the referred screw terminal of the relay board. For example "In 1" wire goes into Relay 1 In screw terminal, "In 2" wire goes into Relay 2 screw terminal and so on. |
 |
|
4.Connect the GND wire of the flat ribbon cable into the GND screw terminal of the relay board.
|
 |
|
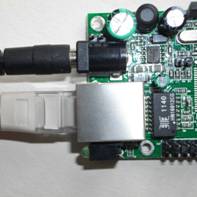
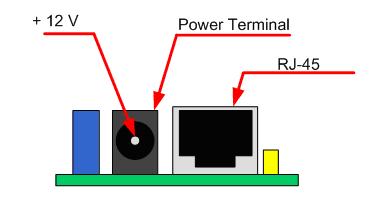
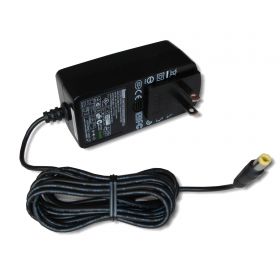
5.Connect supply jack to DAEnetIP2. You will have to find suitable power supply adaptor. DAEnetIP2 minimal supply voltage is 7.5 VDC. The maximal voltage is 25 VDC. It is recommended the supply voltage to be 12 VDC but 24 VDC also will work (in case you have 24V relay board and want single power supply source). DAEnetIP2 doesn't have any protection against inverted supply voltage, so be careful. The middle pin of the power terminal is + Vcc (center positive tip polarity)
|
 |
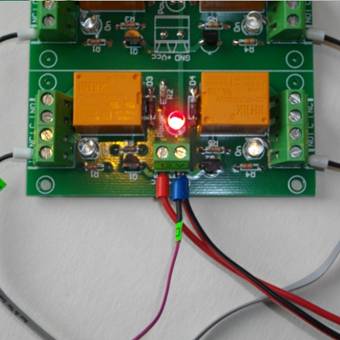
|
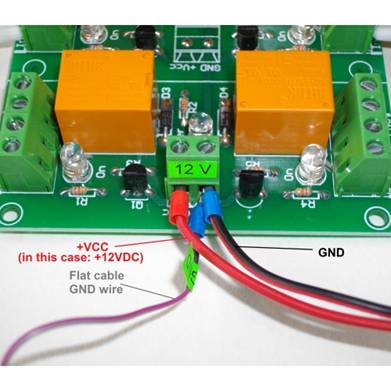
6.Connect the power wires to the relay board as it is shown on the image right to the text. It is possible to supply the DAEnetIP2 controller and relay board either with single either with 2 separate power supply sources.
|
|
|
7.Now you can power on the whole kit (for example plug the supply adaptor into the electricity network)
|
|
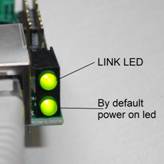
|
8.In case of success you have to see this when you power on the kit (the link led (top) is blinking and the bottom led by default shows the power on and it is constantly on)
|
 |
|
9.Check if the relay board power led is on constantly
|
 |
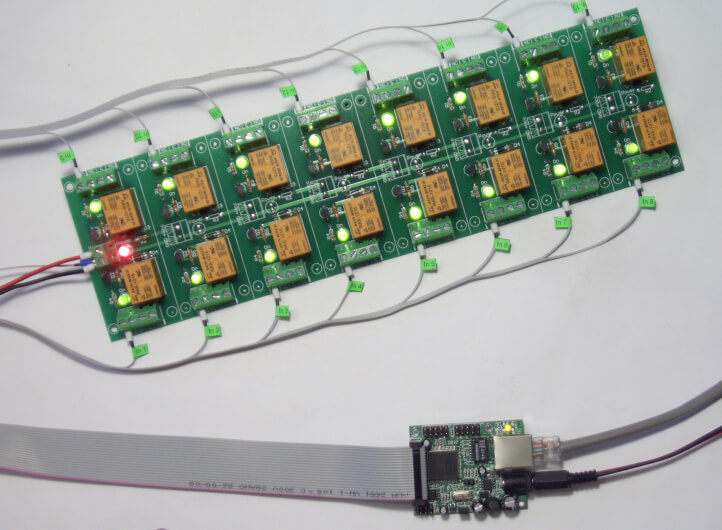
| 10. The kit in working condition |
 |
|
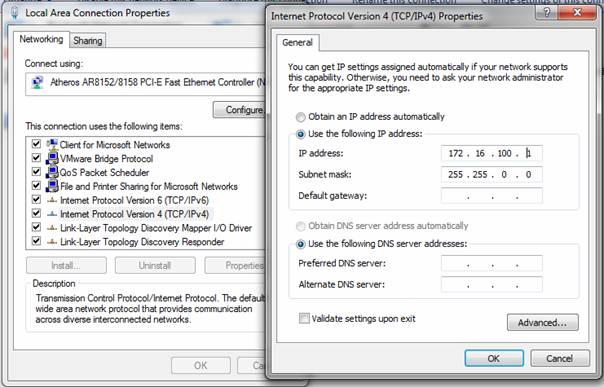
11.Open your LAN card network settings and save them, because next step is to change them.
|
|
|
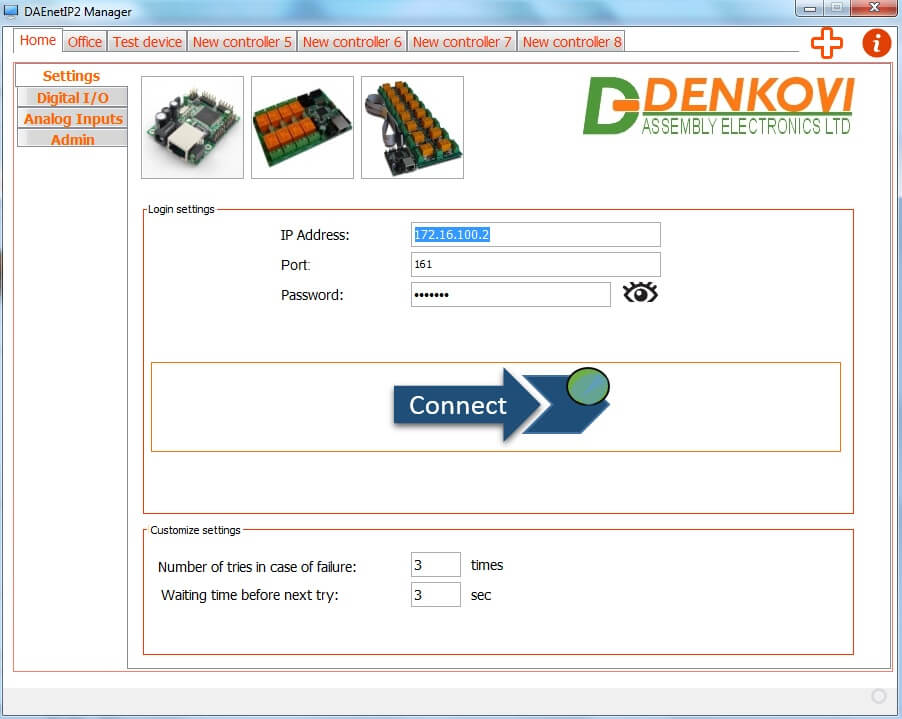
12.Your initial computer IP should be in the device network range. So it is recommend to be 172.16.100.1. Mask 255.255.0.0. Gateway 172.16.100.1. Change them. There is lot of info in the net how to do it (for example a good link is this one)
|
 |
|
13.Open web browser and type 172.16.100.2 – default username/password are “admin”/”admin”
|
|
|
14.Now you can access all the parameters via your web browser or software on your computer.
|
How do connect sensors to DAEnetIP2
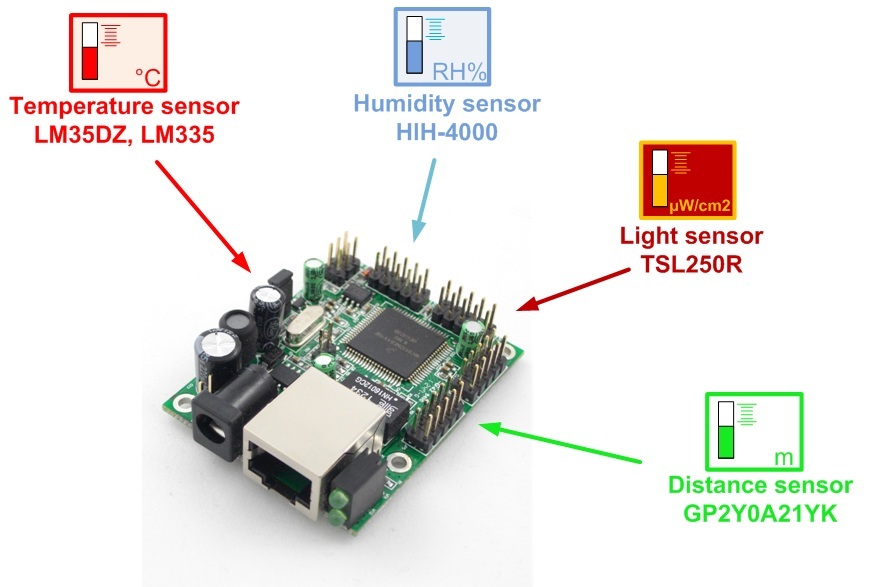
More information how to connect different types of sensors to the DAEnetIP2 Analog Port -
http://denkovi.com/connecting-analog-sensors-to-daenetip2
Default settings
|
The controller has default settings, in case the access is lost. There are several steps for loading the default settings:
|
|
||||||||||||||||||||||||||||||||||||||||||||||||||||||||||||||||||
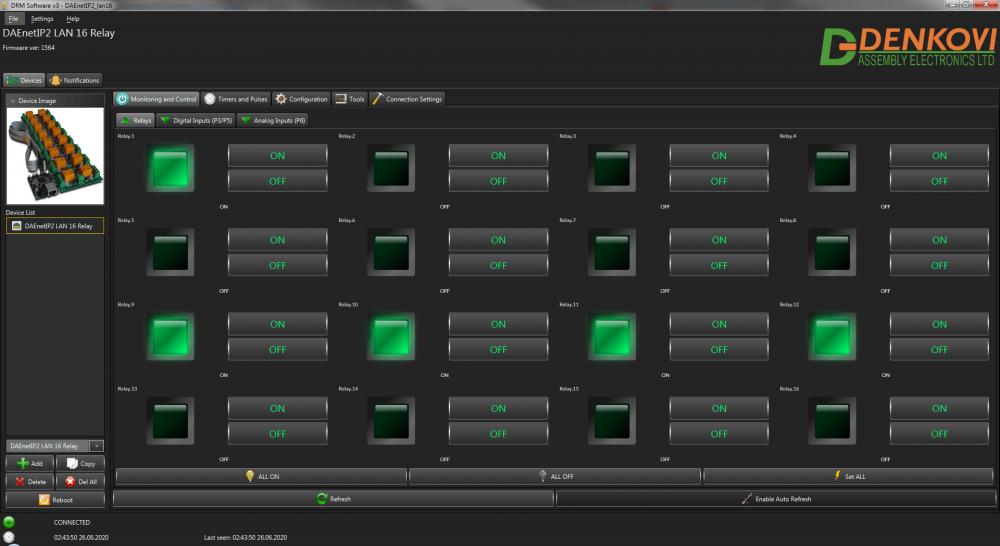
Access via software DRMv3
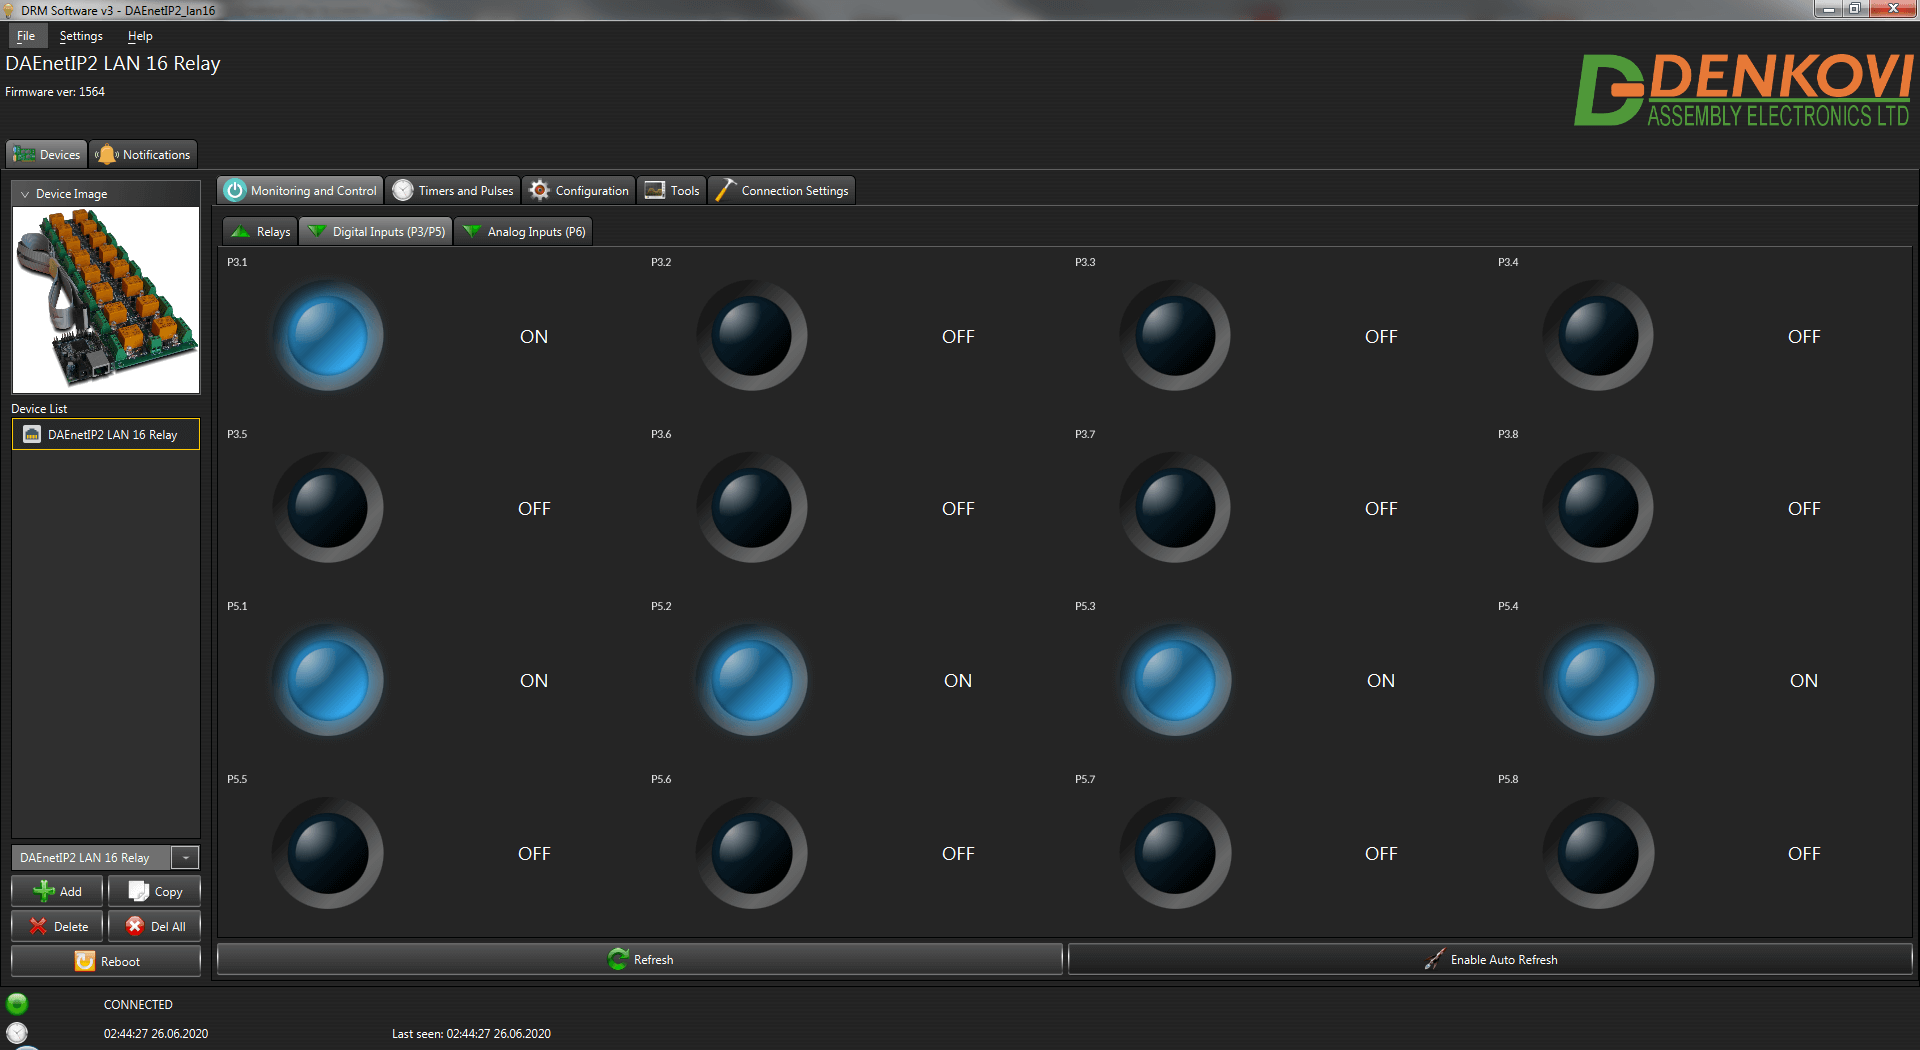
This device is supported by DRMv3 Software.
The device can be found in the device list under the default name: DAEnetIP2 LAN 16 Relay

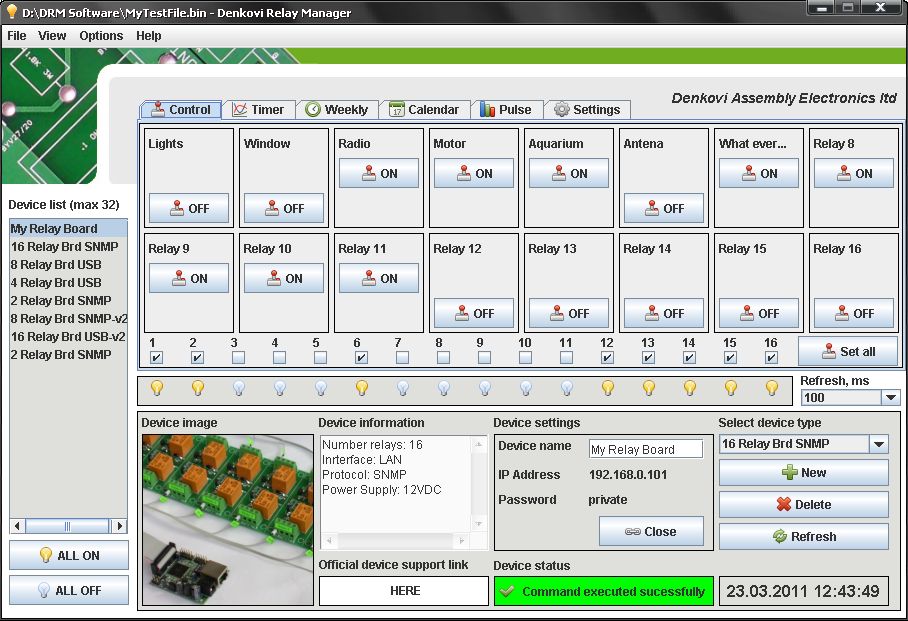
DRM Software
The device is supported by DRM Software. DRM Software is Windows/Linux software for controlling all our relay boards. Supported OS:
Windows: tested on XP, Vista, 7 and 8
Linux: tested on Ubuntu and OpenSuse

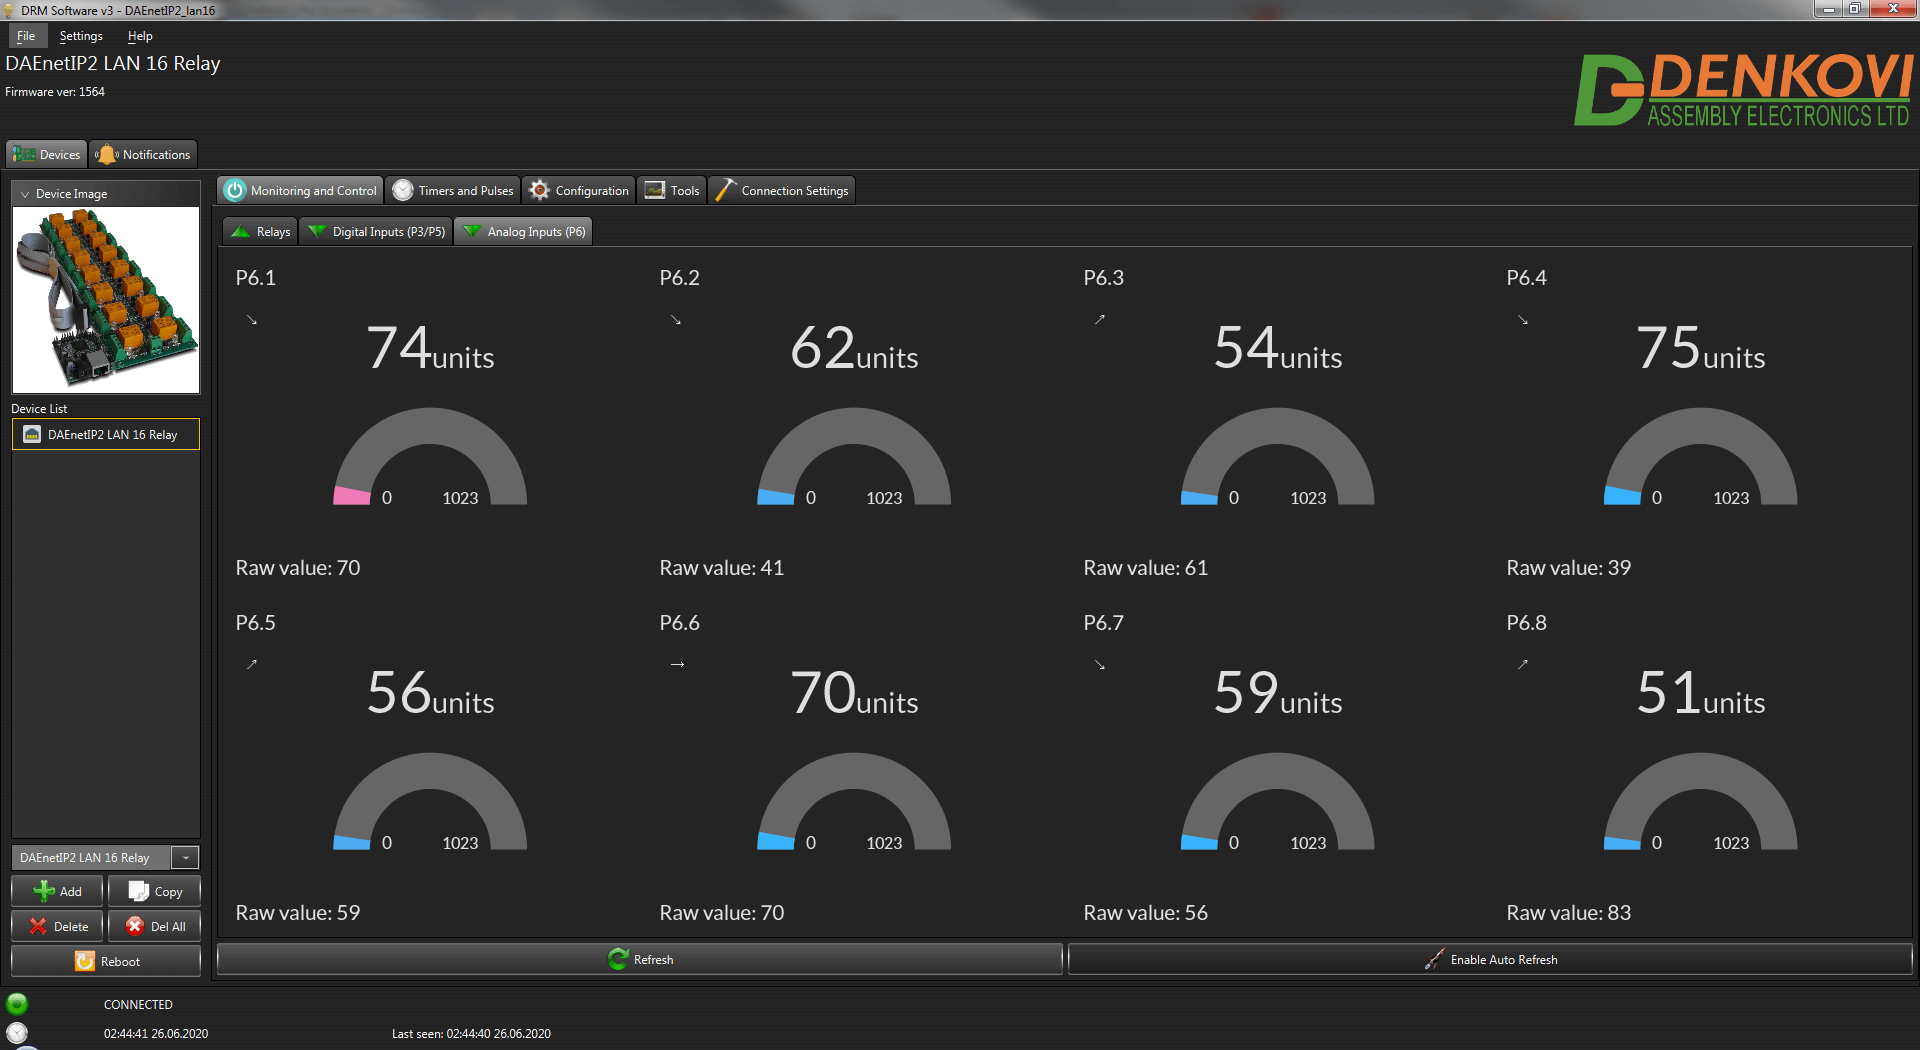
DRM Software image - control mode for Internet / Ethernet Sixteen Channel Relay Board
![]() For more information about DRM Software, documentation and download - here
For more information about DRM Software, documentation and download - here
![]() Download the last version (install package) - DRMsetup.exe
Download the last version (install package) - DRMsetup.exe
![]() Download the last version (intstall archive) - DRMsetup.rar
Download the last version (intstall archive) - DRMsetup.rar
Youtube video
DAEnetIP2 Manager ![]()
DAEnetIP2 Manager is configuration utility for Denkovi DAEnetIP2 controller
- Access many DAEnetIP2 controllers at a time
- SNMPv1 protocol
- Name for each controller
- Support most of the DAEnetIP2 OIDs
- Configurating each P3/P5 I/O line separately as input or output
- Linearization (scaling) for the Analog Inputs (displaying the analog inputs values in human reading values - volts, meters degrees)
- Thresholds can be converted automaticaly from human units into divisions
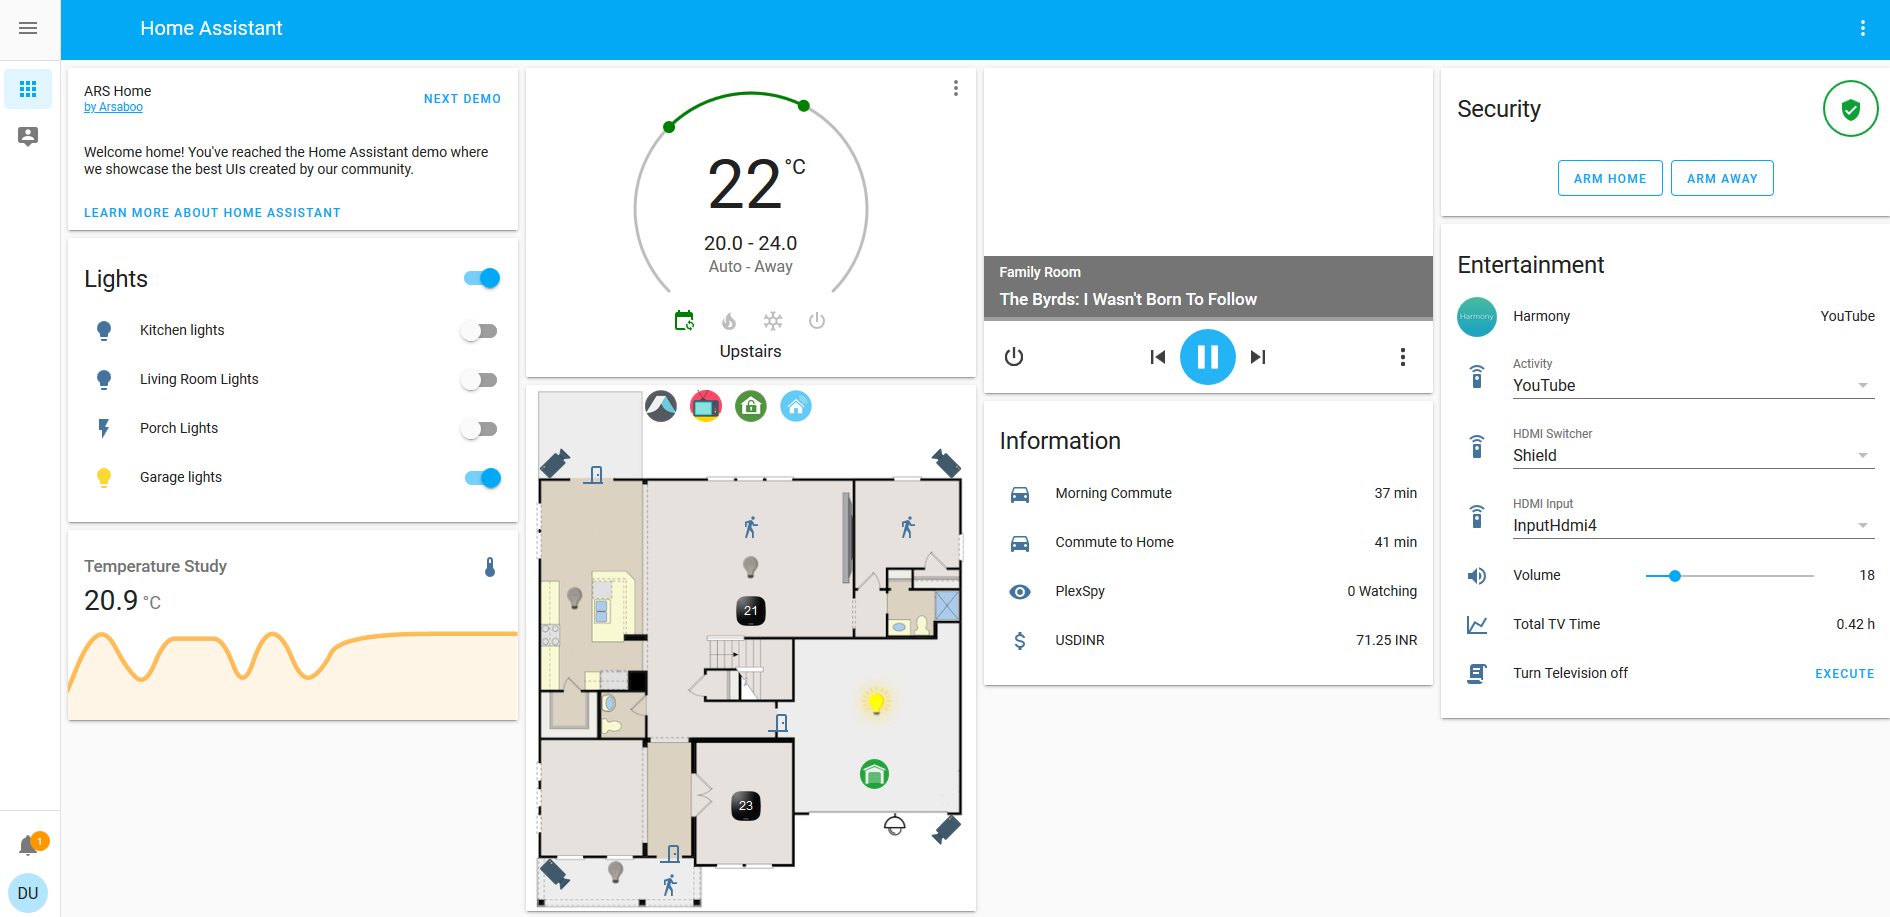
Access from Home Assistant
Home Assistant is very powerful home automation system. Please checkout our application note for more information.
Access from OpenHAB
OpenHAB is a third party open source free home automation software. Run your server on Linux, macOS, Windows, Raspberry Pi, PINE64, Docker, Synology... Access it with apps for the web, iOS, Android and others. Use a powerful and flexible engine to design rules, with time and event-based triggers, scripts, actions, notifications and voice control.
The device can be accessed via SNMP requests. More information about the integration with our hardware - http://denkovi.com/openhab-with-denkovi-modules or contact with us.
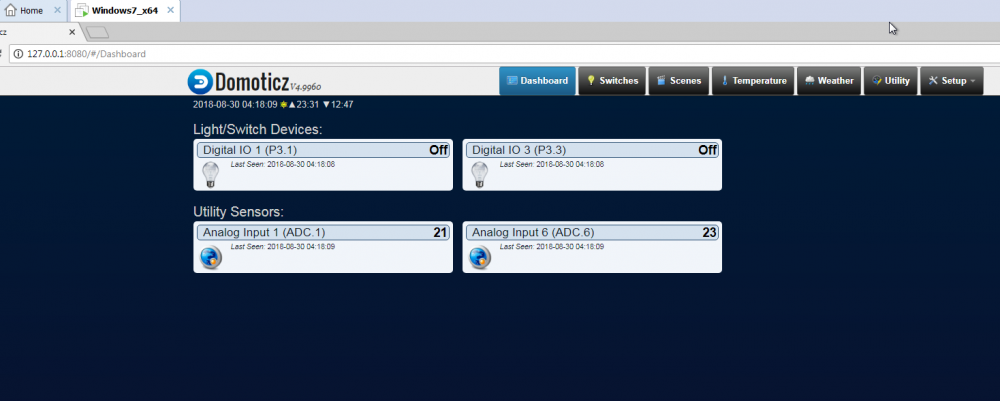
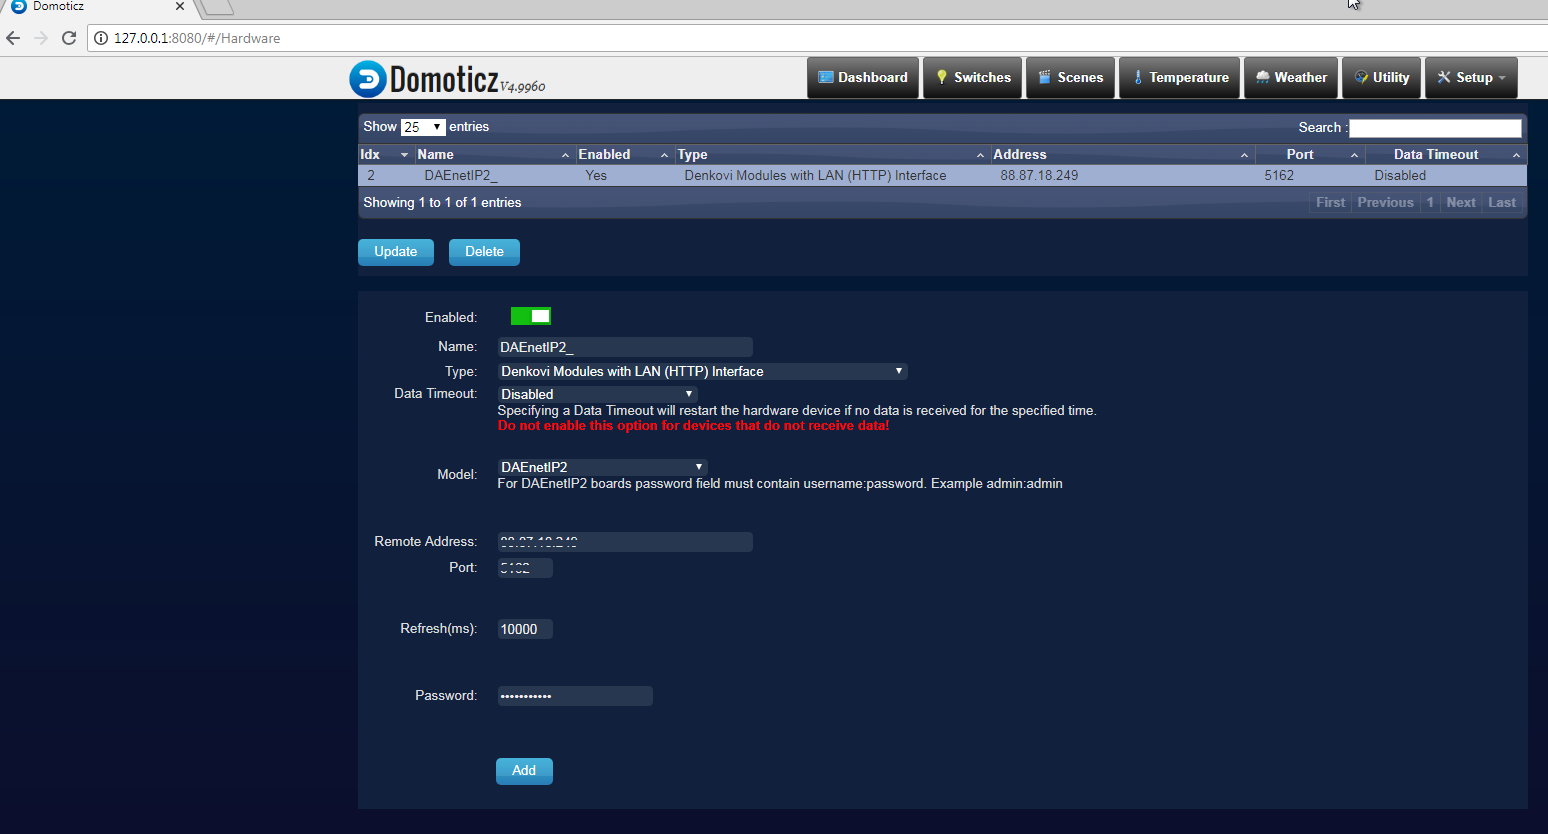
Access from Domoticz
Domoticz is a free open source popular home automation software which can run on Windows, Linux, MAC, Rasberry PI and others. It is a home automation system design to control various devices and receive input from various sensors. Access it with apps for the web, iOS, Android and others.
More information about how to connect and use it with our hardware - http://denkovi.com/domoticz-with-denkovi-modules or contact with us.

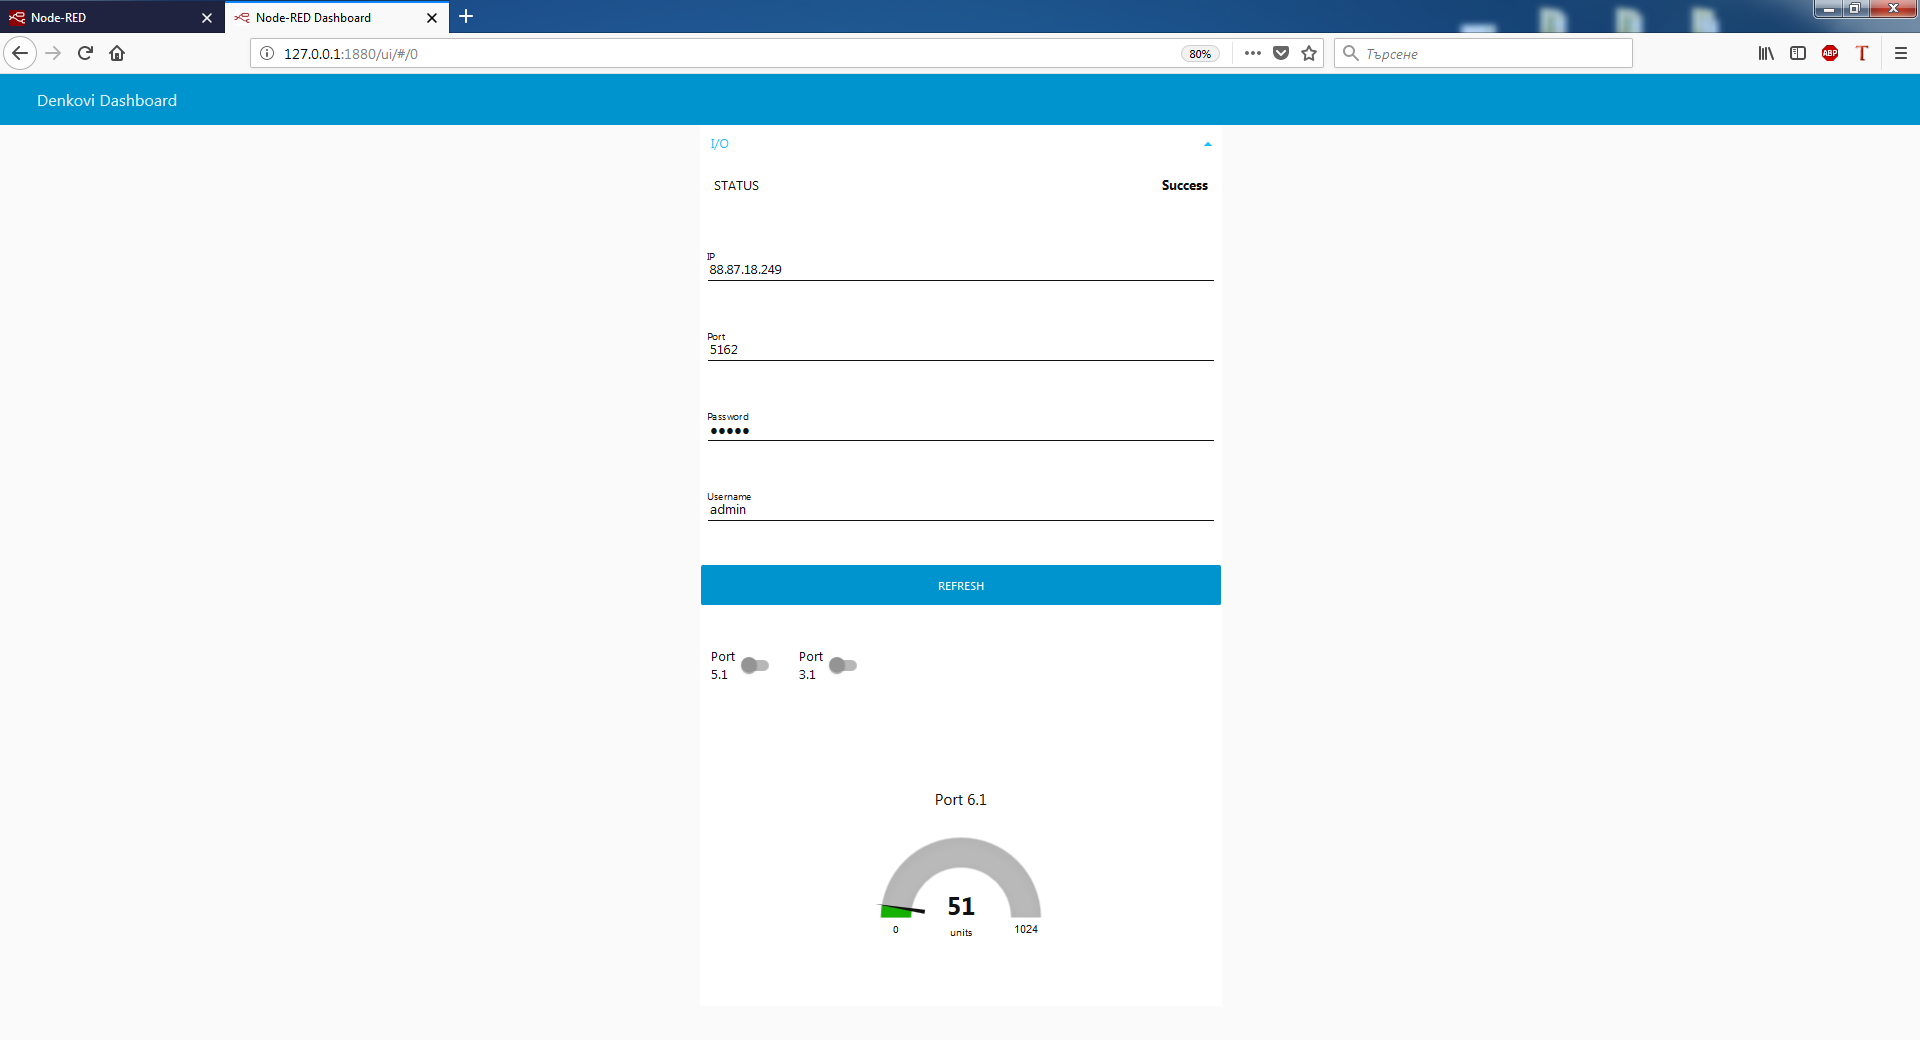
Access from Node-RED
Node-RED is a flow-based programming platform for the Internet of Things. We prepared small example for communication between Node-RED and our device. More info about Node-RED and denkovi modules: here
You can download the example Node-RED flows from here: SNMP and HTTP
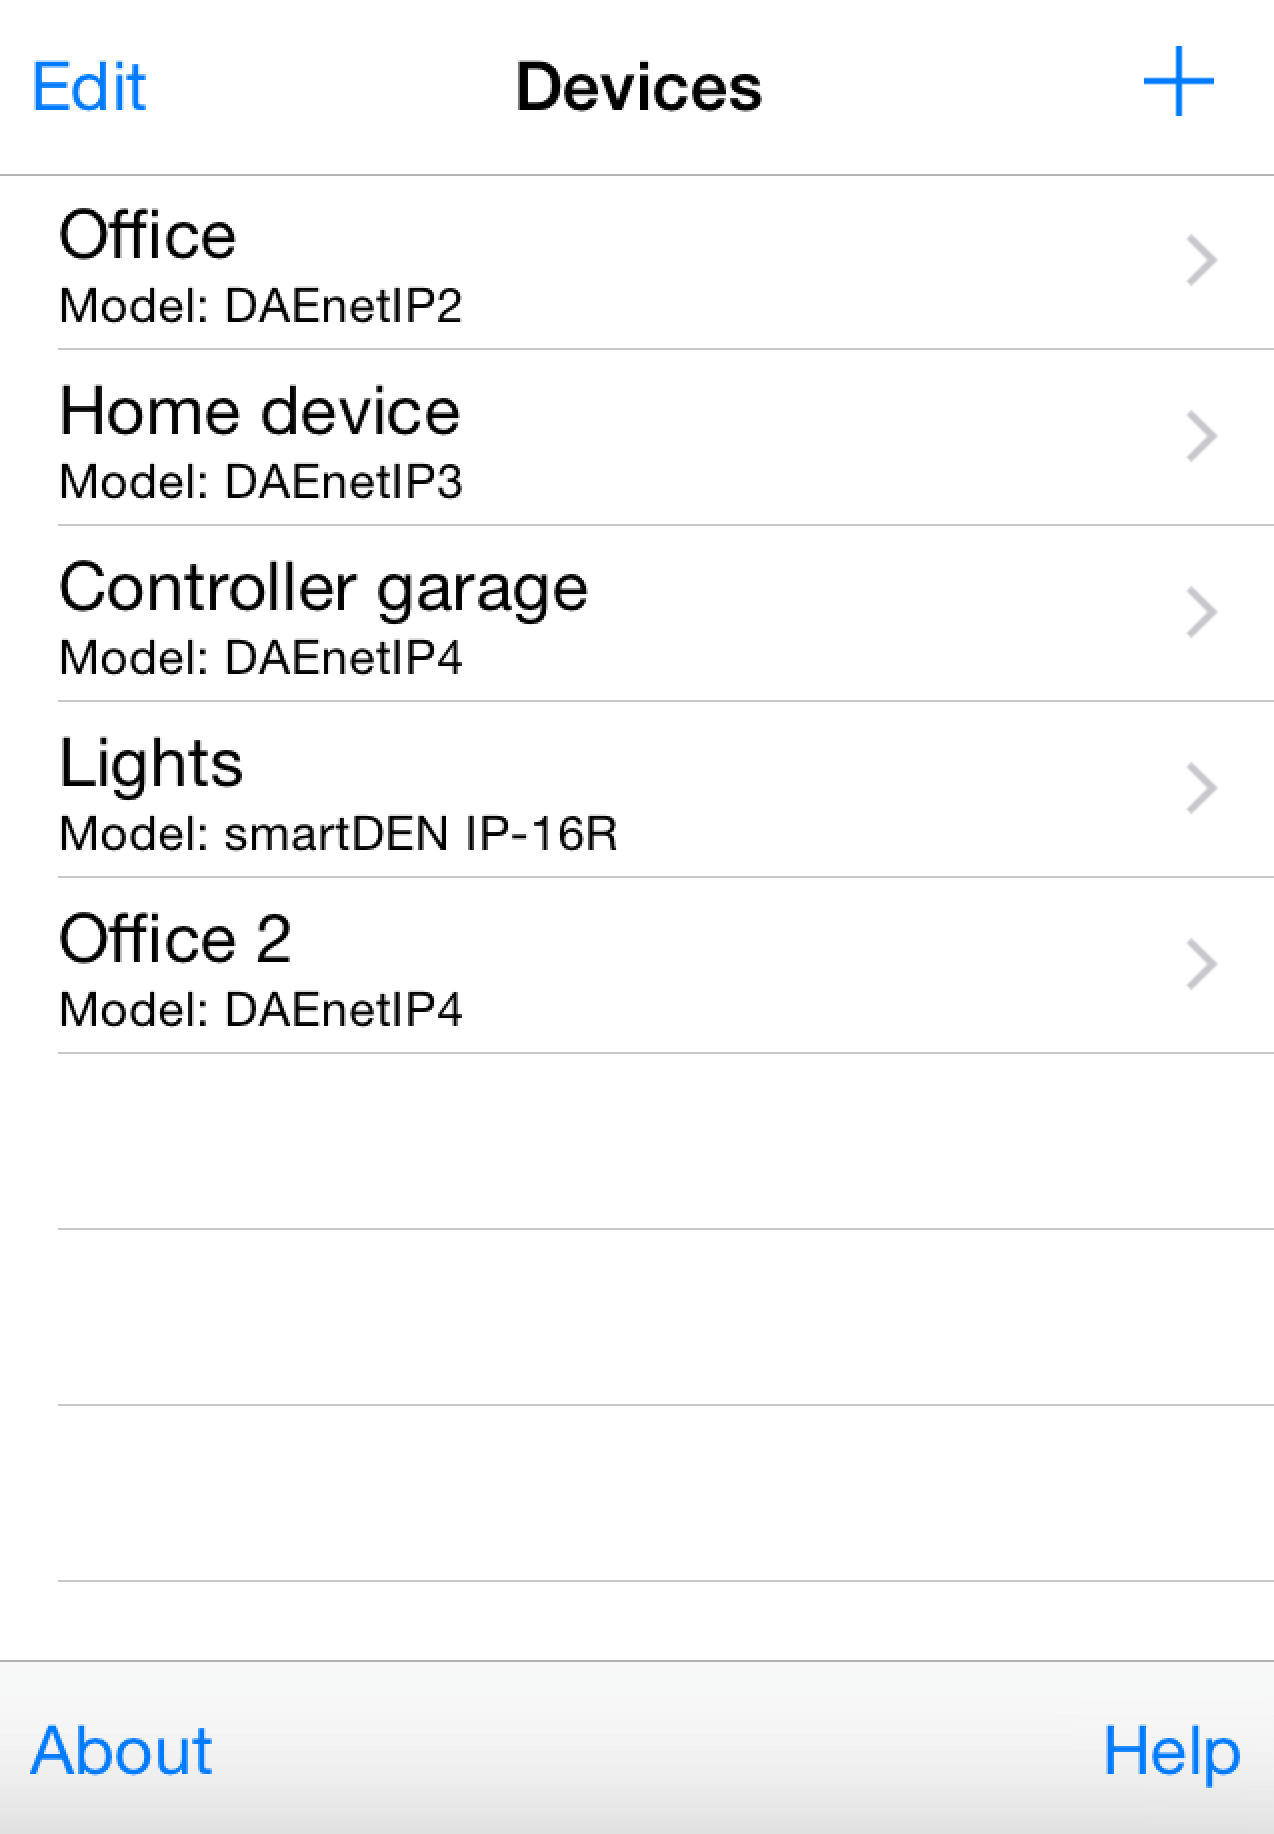
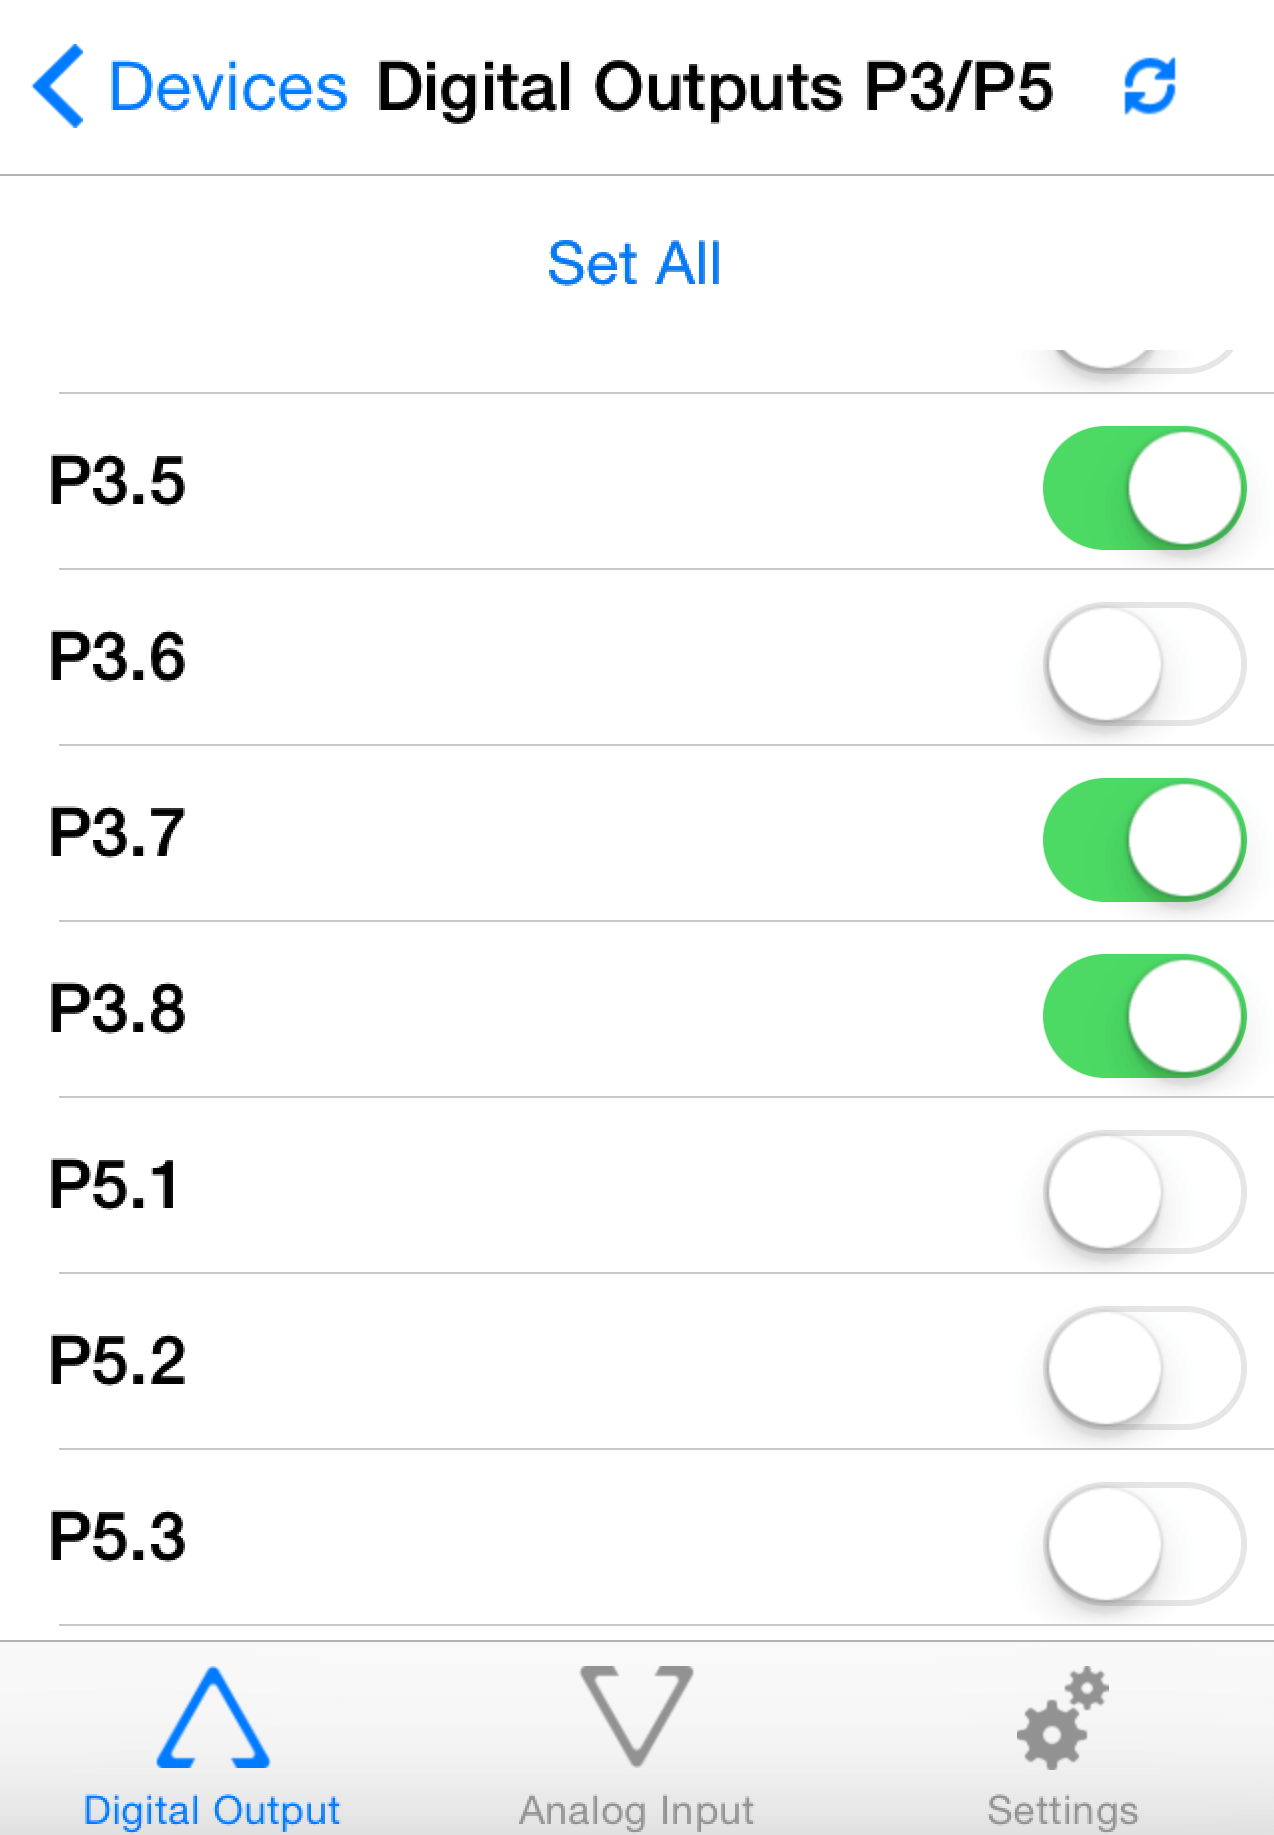
Access DAEnetIP2 from mobile devices
iOS App DAE-iModules

![]()
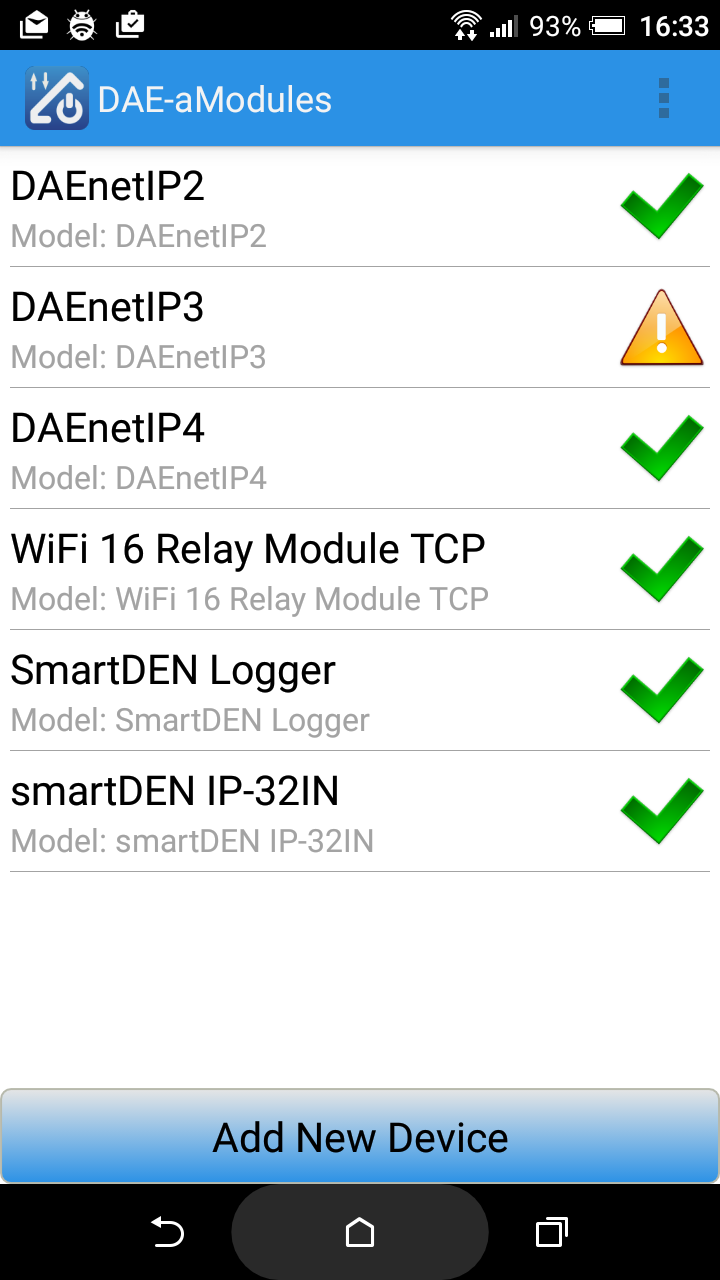
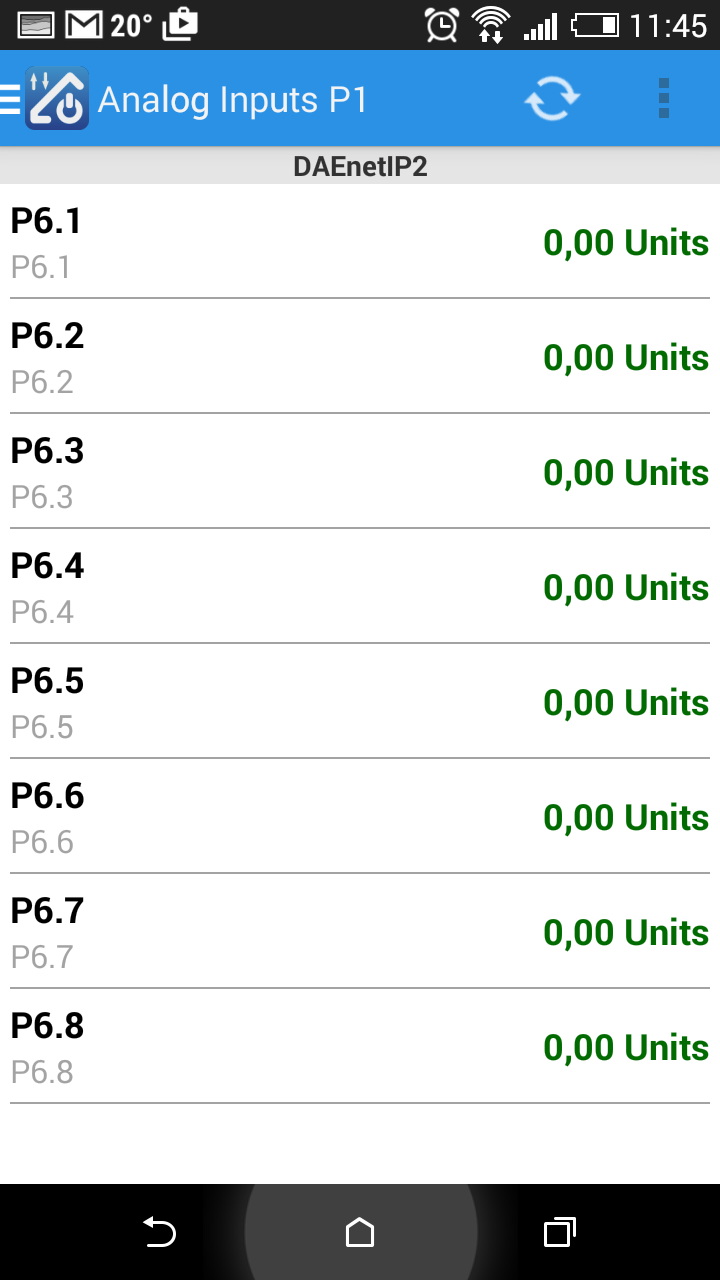
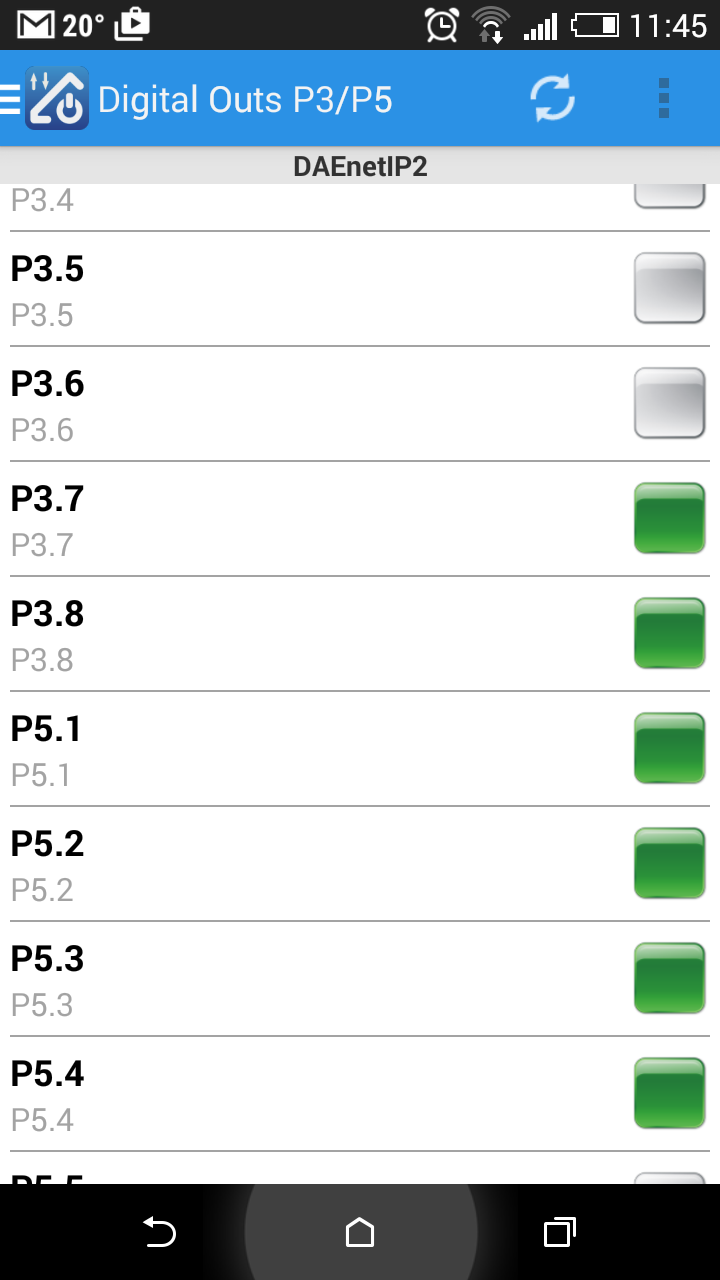
Android App DAE-aModules


The video bellow shows how you can control DAEnetIP2 based device - SNMP 8 Relay Board LM35DZ. Any other Denkovi Ethernet Device from this list can be acessed with same success from your iOS device via DAE-iModules.
![]() Some useful information about DAE-aModules/DAE-iModules and DAEnetIP2:
Some useful information about DAE-aModules/DAE-iModules and DAEnetIP2:
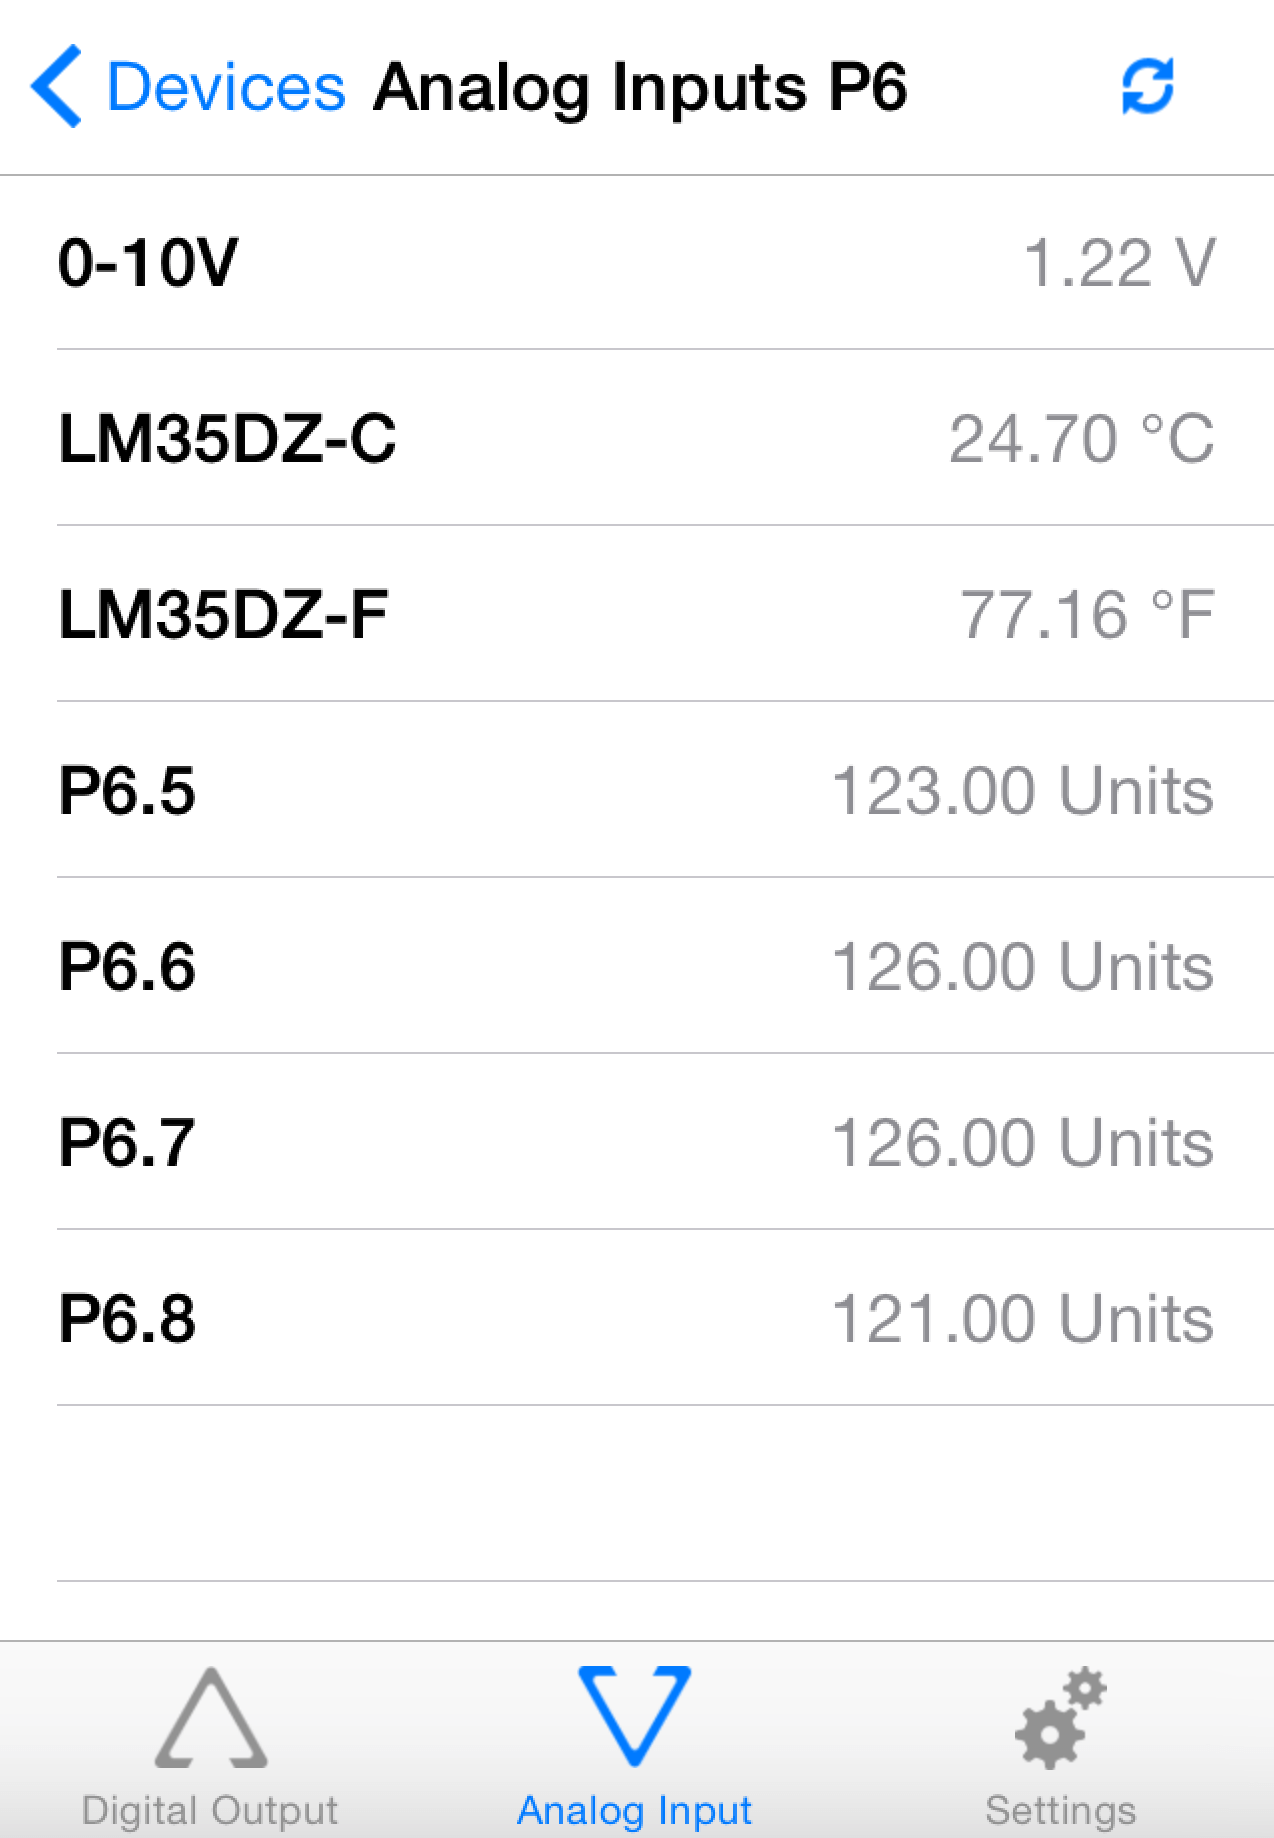
- Select device DAEnetIP2. You must be sure the IP, UDP Port and SNMP community are correct, otherwise it won't enter into the device
- To connect and scale the analog inputs with sensors, please refer to this link: http://denkovi.com/connecting-analog-sensors-to-daenetip2.
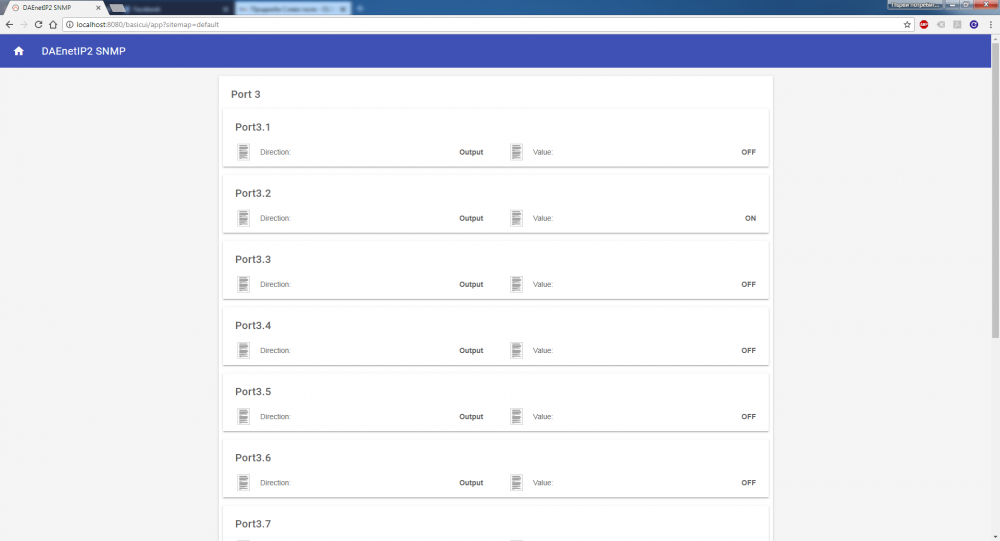
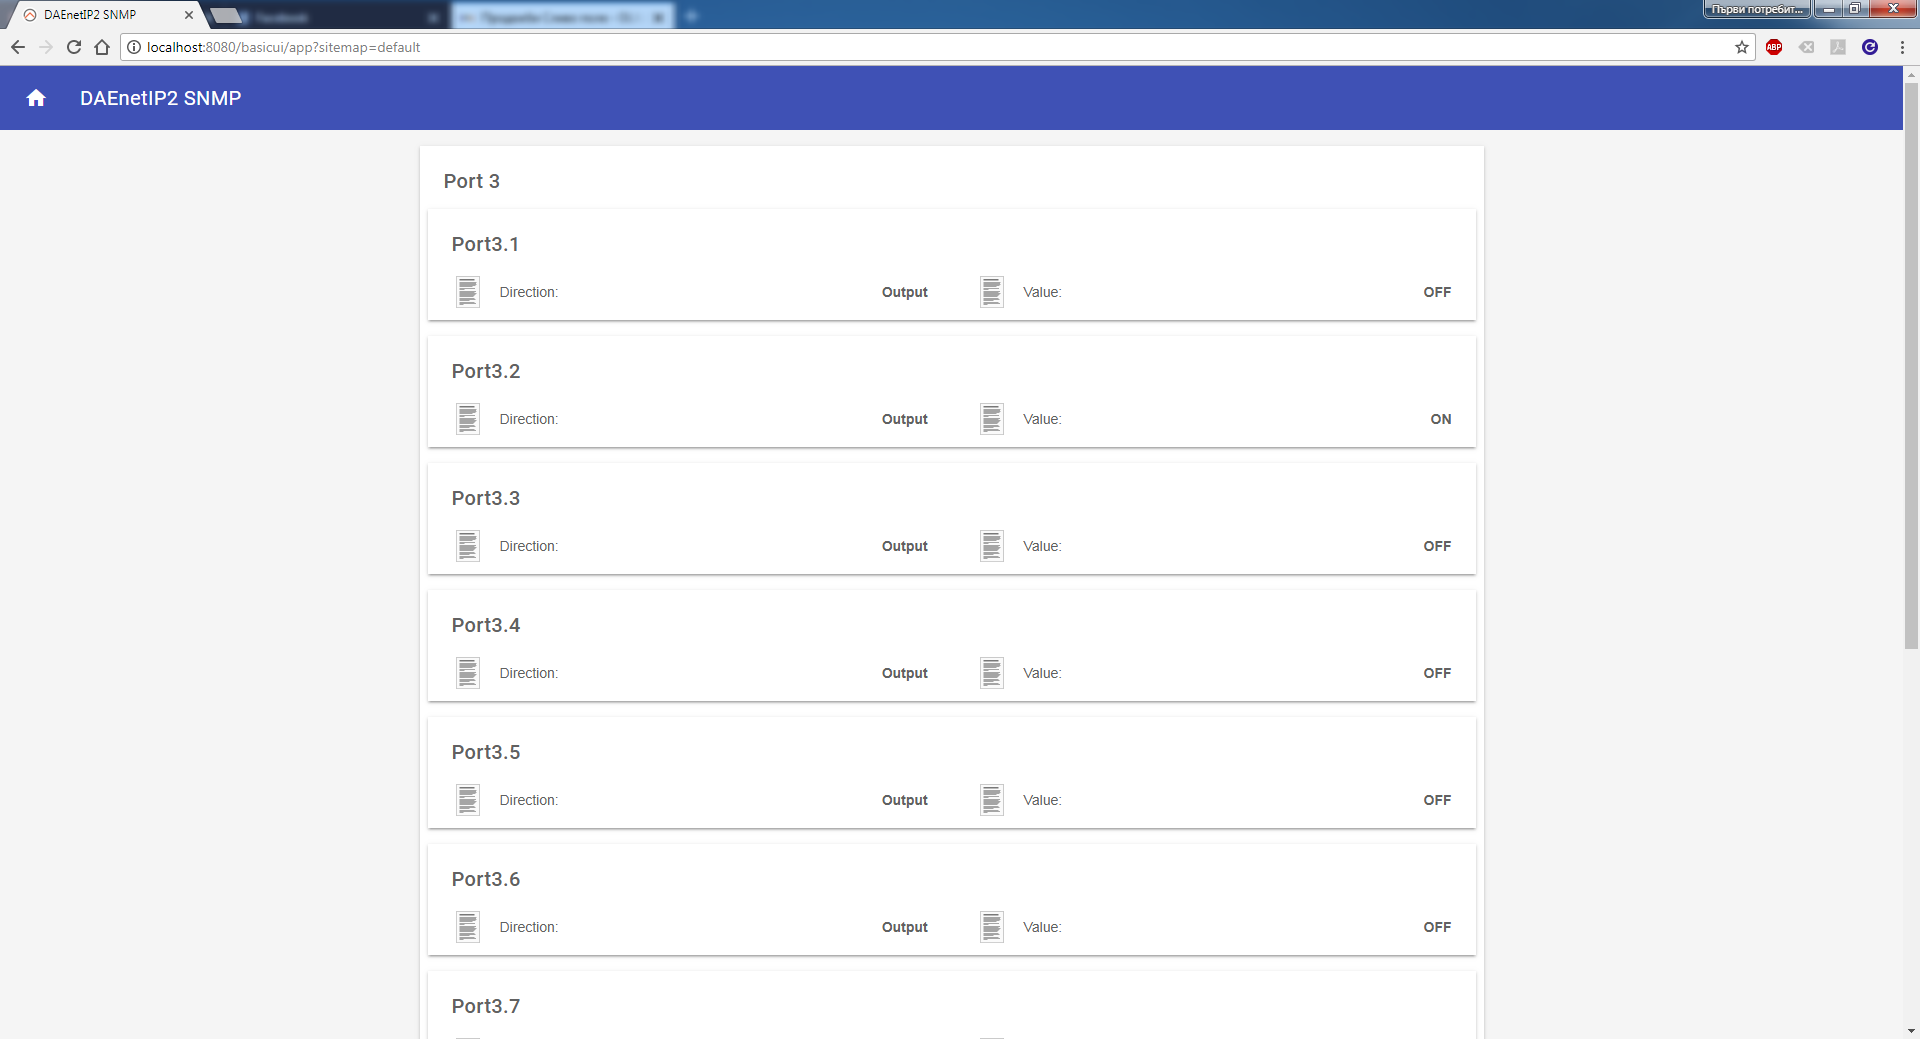
Control via web browser
In order to access your DAEnetIP2 controller from browser, your web browser have to supports javascript. Just write the IP address of the controller in the address bar and you will see the page, which is integrated in the controller (it has small built in server). The default username/password are admin/admin.
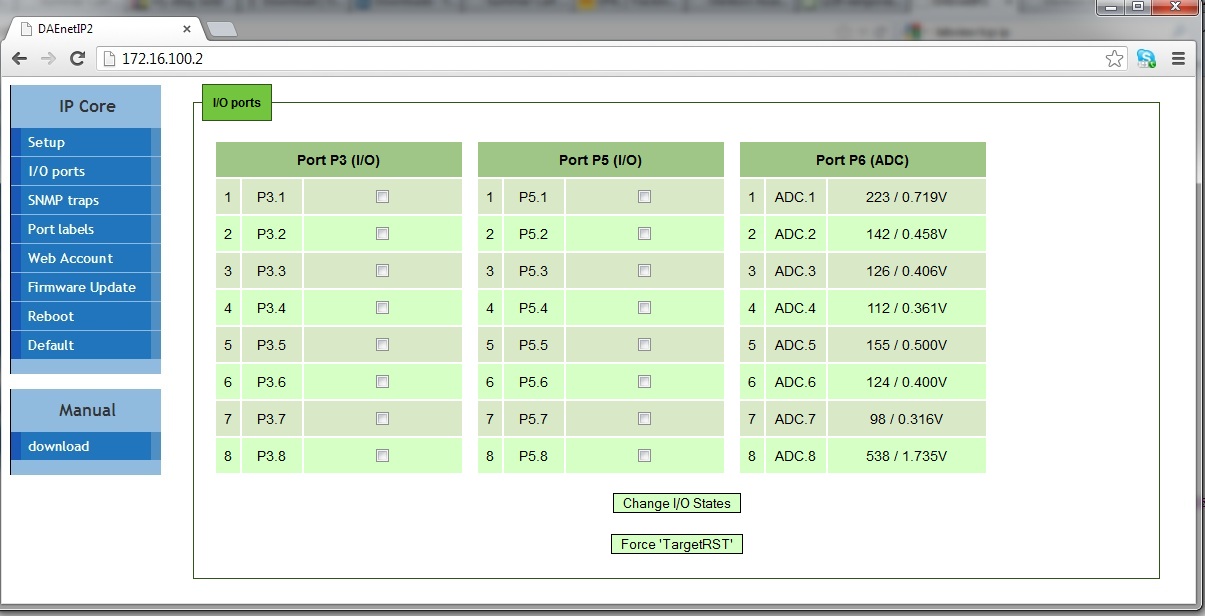
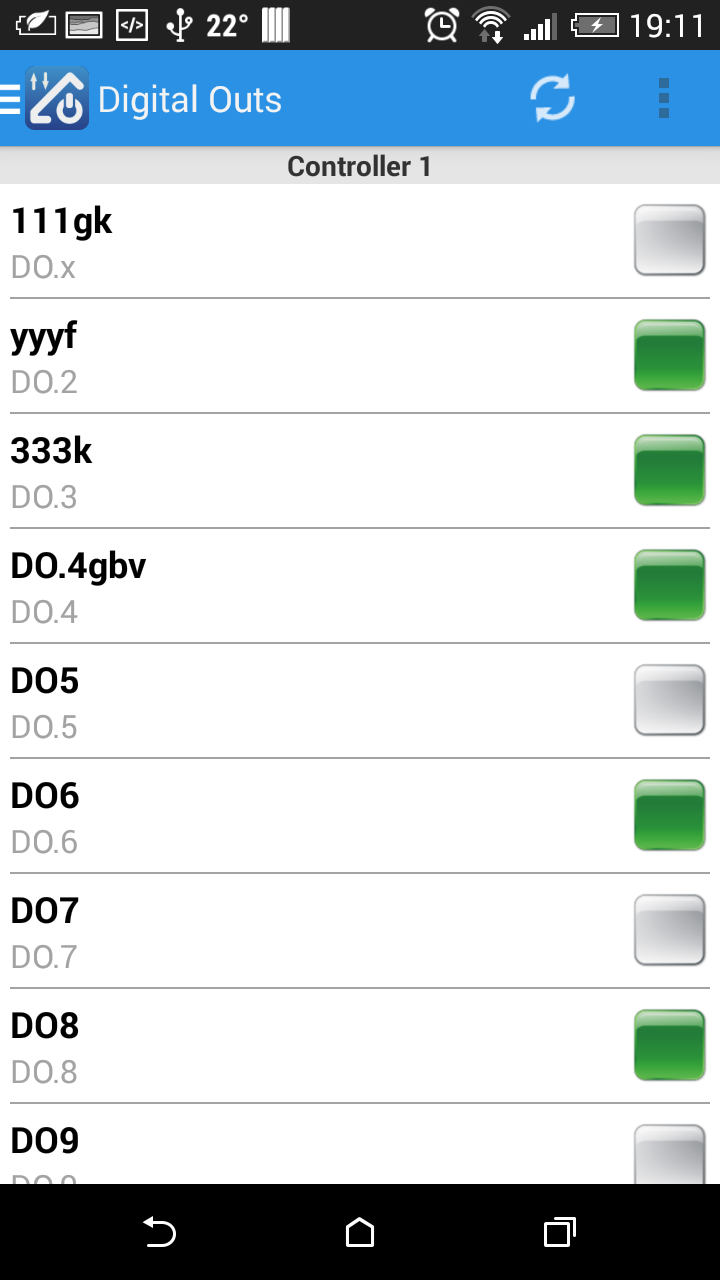
I/O Ports control/monitor
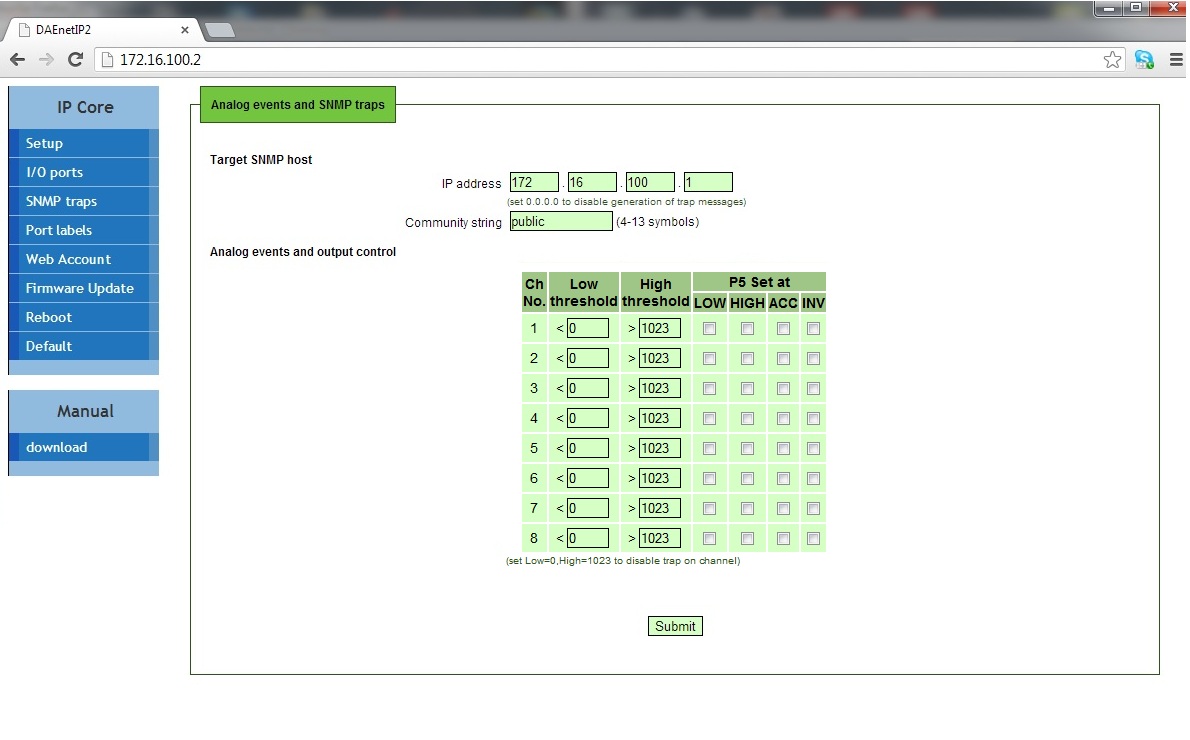
Traps/P5 control. DAEnetIP2 can send traps if some analog input changes its level bellow/above some threshold (Low/High).
The same logic can be used for setting one of the digital outputs port - JP5 according analog input port JP6.
HTTP API commands
DAEnetIP2 i/o lines can be controlled/accessed via HTTP API commands and basic access authentication is required to do that.
The digital outputs (P3 and P5) can be controlled by sending this HTTP command:
http://admin:admin@device.ip.address/iochange.cgi?ref=re-io&01=00&02=FF
admin:admin are the username:password
device.ip.address is the DAEnetIP2 IP address (by default it is 172.16.100.2)
01=00 is the state of P3 DO
02=FFis the state of P5 DO
For example:
http://admin:admin@172.16.100.2/iochange.cgi?ref=re-io&01=00&02=FF
The i/o states (P3, P5, P6) can be retreived by sending this HTTP command:
http://admin:admin@device.ip.address/ioreg.js
it will be received javascript file with several variables and one of them is:
var IO=new Array (0xFF, 0xFF, 0x80, 0x00AB, 0x0049,
0x0118, 0x014A, 0x012F,
0x003E, 0x0029, 0x01DD)
Bytes 0 and 1 are the digital I/O states (in hex format)
Bytes 3...10 are the Analog inputs values (in hex format)
For example:
http://admin:admin@172.16.100.2/ioreg.js
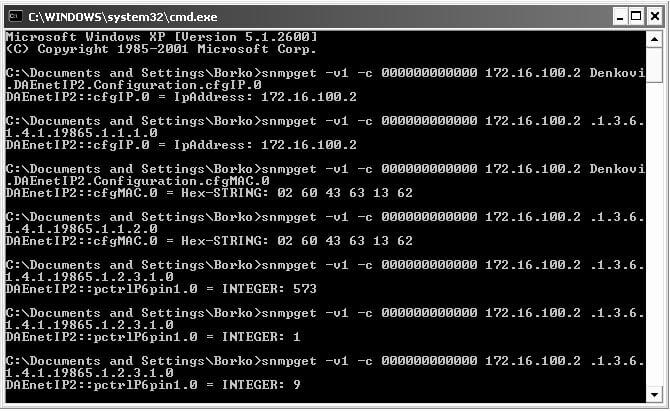
Control DAEnetIP2 via command line
Net-snmp is free command line utility for windows which allows you to execute snmp commands from command line, BAT files, BASH scripts or any other sofwtare that can execute external .exe file or commands from command line. The instructions file how to install net-snmp and example commands can be downloaded from here.
Software examples
For developers - we can provide examples and support for the following platforms:
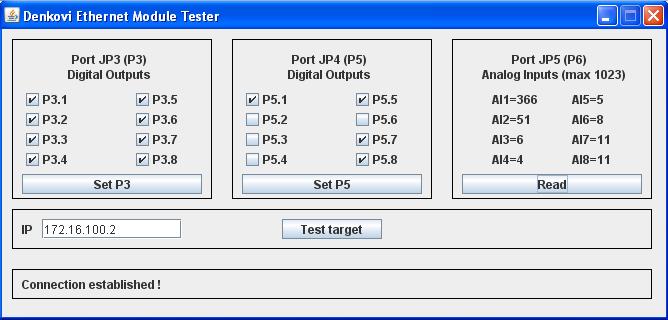
Java Example
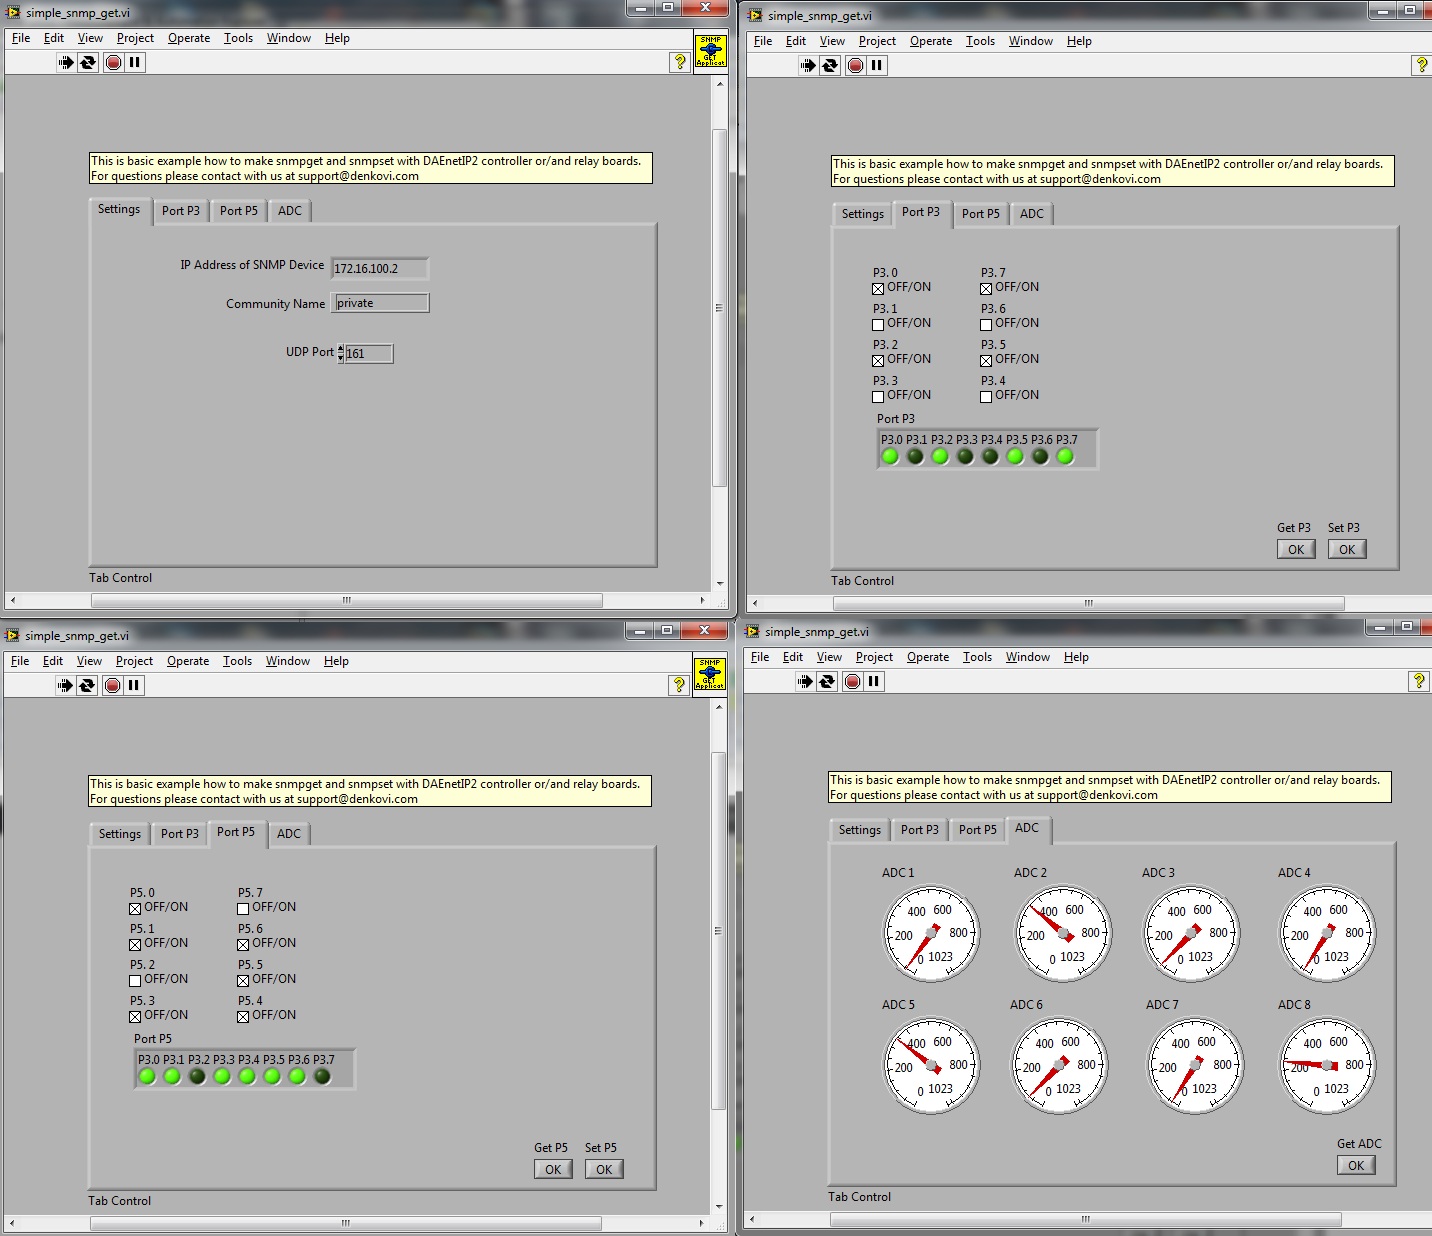
labVIEW example
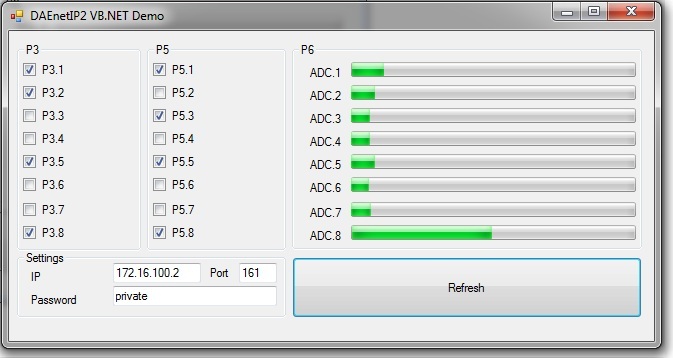
VB.NET Express example
Links
 User manual - download link will be sent to your email after purchase or by request.
 SNMP definitions file (MIB file) - here
 How to connect sensors to DAEnetIP2 controller itself - here
Denkovi software
- DAE-iModules - App for iOS mobile devices, support link here
- DAE-aModules - App for Android mobile devices, support link here
 DAEnetIP2 Manager (Windows/Linux) - Configuration utility - download here
 DRMv3 Software - software for monitoring, control and configuration - here
 DRM Software - software for controlling relays - here
 Home Assistant - This device is supported by Home Assistant. For more information - please follow this article.
 Domoticz - This device is supported by the powerful home automation system Domoticz. Please take a look at our application note for more information - http://denkovi.com/domoticz-with-denkovi-modules
 openHAB - This device is supported by the powerful home automation system openHAB. Please take a look at our application note for more information. You can also download the configuration files for openHAB (ver 2.2.0) for communication via SNMP requests.
 MyDomoticaHd - Android software by www.phsoftware.altervista.org. Additional explanation how to use the software with our ethernet relays and ip controllers - here: http://denkovi.com/mydomoticahd-with-denkovi-ethernet-relays
- Net-snmp command line tool for windows and C++ library - here
- iReasoning MIB browser (very useful tool) - here
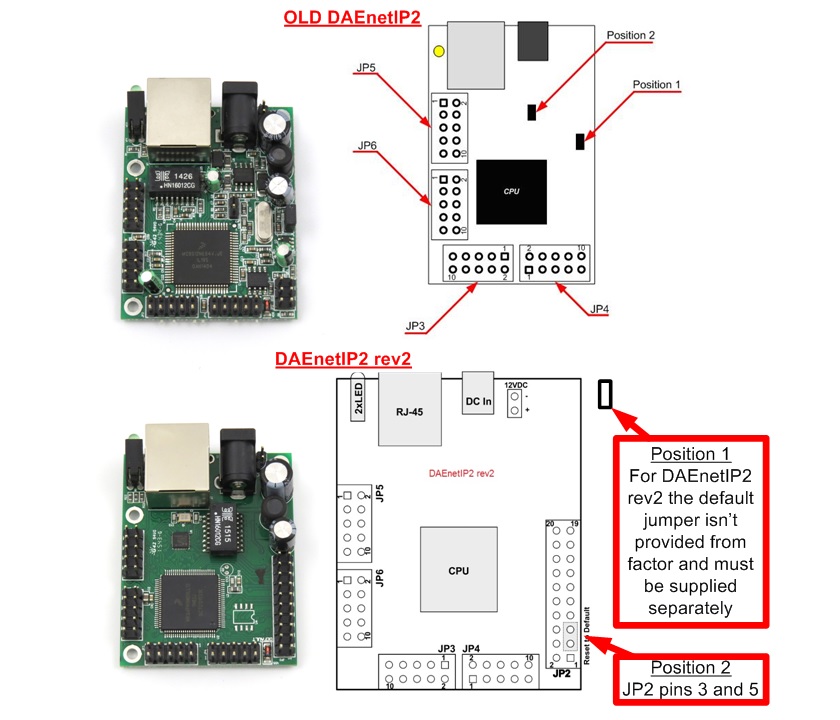
Please use DAEnetIP2 rev.2 firmware files only for DAEnetIP2 rev.2 modules and old DAEnetIP2 firmware files only for old DAEnetIP2 modules! The old and new firmware files are not compatible as there is hardware change from rev.2.
| Release Date | Firmware Version | Hardware revision | Mib File | Update Utility | Version History | Note |
| Nov 2017 | 6.28 | DAEnetIP2 rev.2 | Here | |
Instructions how to update are in the User's manual or at this link. | |
| Feb 2013 | First hardware revison | Here | |
Instructions how to update are in the User's manual or at this link |
| Date | Changes |
| 08 Nov 2017 |
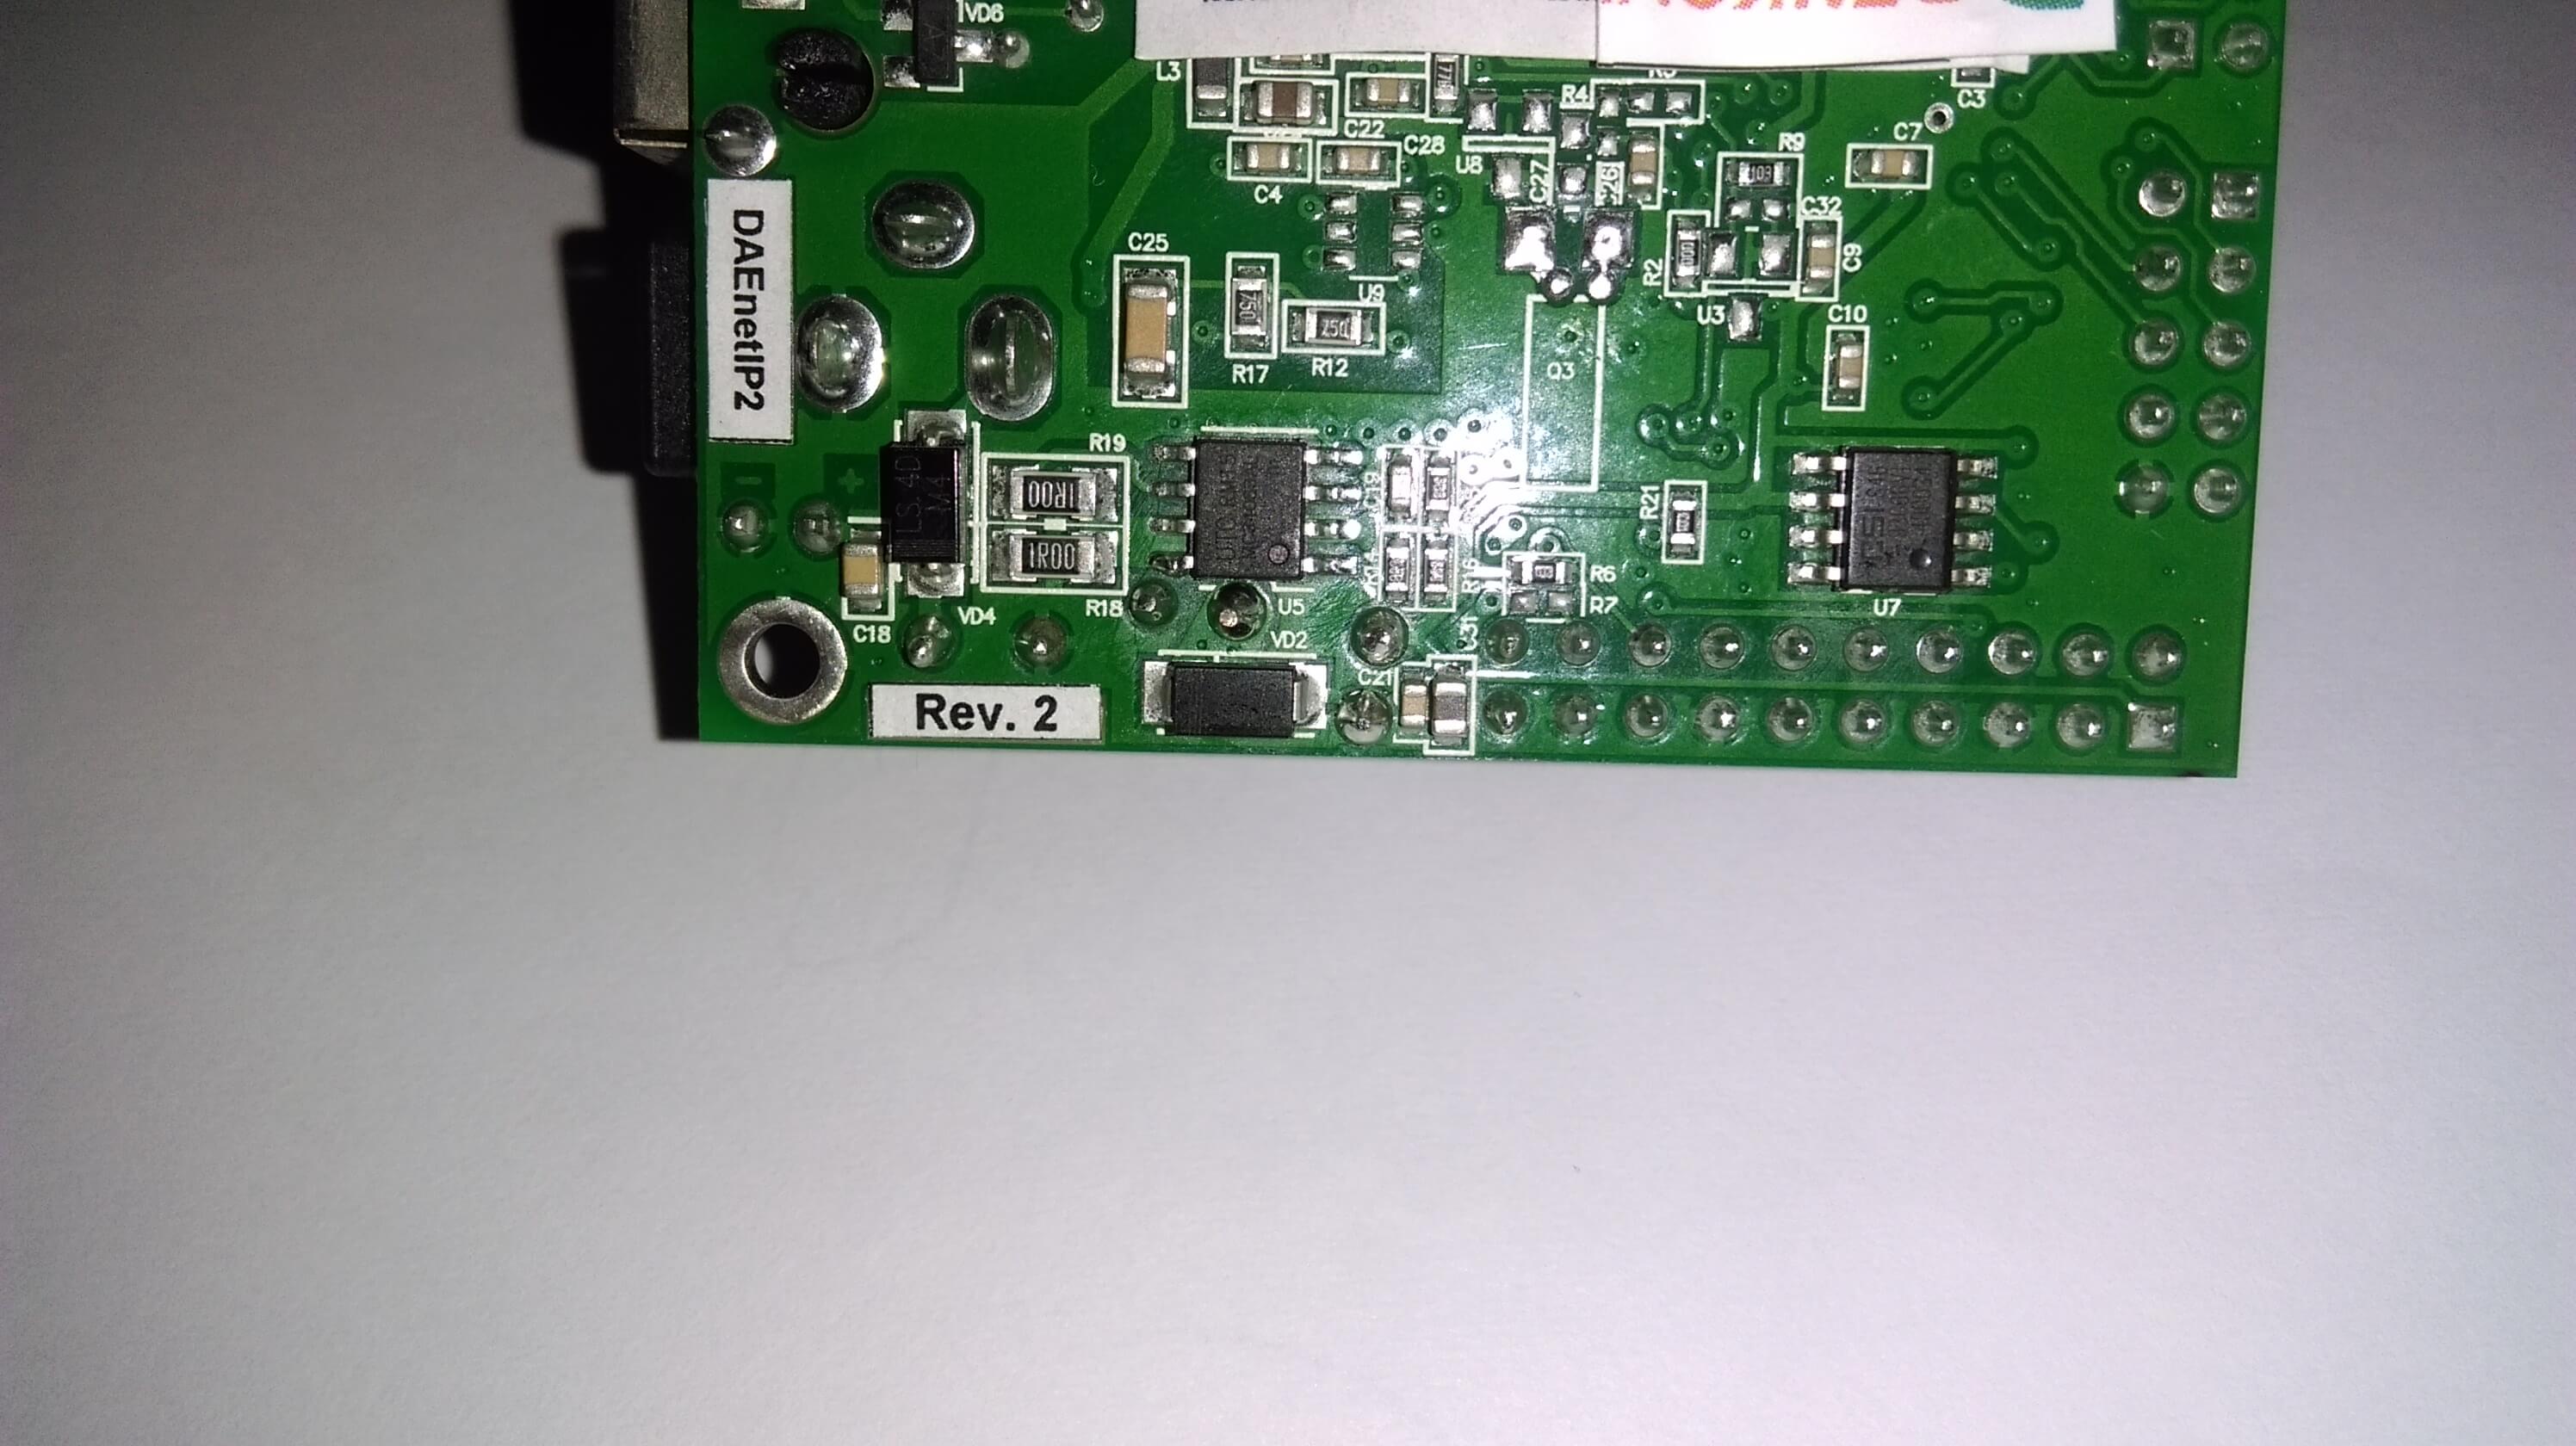
From 08 Nov 2017 we start shipping DAEnetIP2 with minor hardware changes (rev2). The new hardware is designed in a way to keep the compatibility however there are still small changes:
On the picture below it is shown how does it looks like the DAEnetIP2 rev2 module. You will see on the bottom side label with text "Rev. 2" which means that is DAEnetIP2 rev2 module, otherwise you have the old DAEnetIP2 module.
|
Some examples are not public, and the download links will be sent to your email after purchase or by request.
 Node-RED IoT platform - example communication flows in SNMP and HTTP. More about Denkovi modules and Node-RED: here.
 C# .NET Express 2010 - Sets the outputs via snmp v.1 with timeouts
- VB .NET Express 2010 - Very simple demo. It demonstrates how to set and get DAEnetIP2 ports values.
 Java (Netbeans) - Example for accessing DAEnetIP2 controller. Works in Linux / Windows / Mac
 PHP - Example for controlling the 16 digital outputs and reading the ADC (tested with WAMP with snmp)
 labVIEW 2011 - basic snmp manager for DAEnetIP2 build with labVIEW.
 Node.js (SNMPv1) - example how to communicate with the module using SNMPv1 set/get requests in Node.js.
 Python - Example how to set/get the device I/O status using SNMP requests
LAN Relay complete
Ethernet 16 relay board
IP Relay for LAN control
![]() by , 12 Jun 2017
by , 12 Jun 2017
The products is great and work perfectly!This relay has been stable for me for around 2-years, works flawlessly. STRONGLY RECOMMEND!
![]() by , 29 Nov 2016
by , 29 Nov 2016
Great product. Thank you very much, super fast delivery
-

-
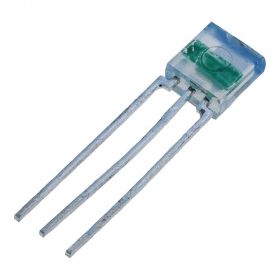
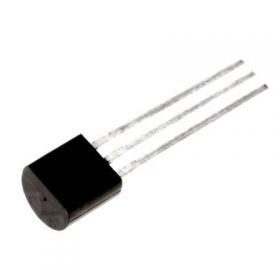
TSL250R light to voltage sensor
TSL250R light to voltage optical sensor, photodiode, supply range: 2.7 - 5.5V DC
Price: $12.40Out of stock -
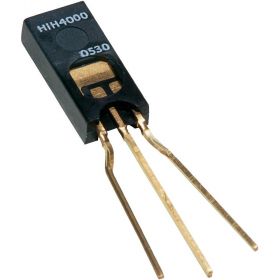
HIH-4000-02 humidity sensor, range:0÷100% RH
Humidity near linear voltage output sensor HIH-4000-02
Price: $40.30 -
-
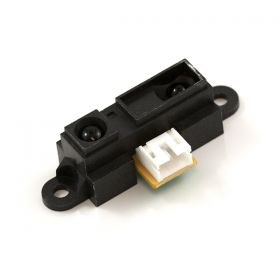
Infrared Proximity Distance Sensor - Sharp GP2Y0A21YK, 10-80cm
GP2Y0A21YK is infrared proximity sensor made by Sharp. It has analog output from 3.1V at 10cm to 0.4V at 80cm which make it suitable for using along with our modules
Price: $23.65 -
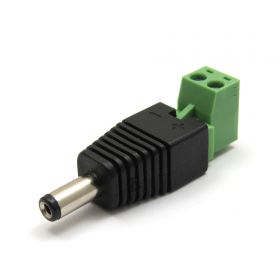
2.1mm DC Jack to Terminal Tool
Power supply interconnector jack to terminal tool 2.1 Х 5.5 Х 9mm
Price: $2.20 -

Split Core Current Transformer with 0-5V DC output
A split core current transformer which is able to produce a 0-5V DC signal with an AC primary current (from 5 to 50A selectable). The split core allows the transformer to be clipped on to a wire without disconnecting the primary current carrying wire.
Price: $19.95 -
SUNNY SYS1541-2412 Switching AC Power Adapter 12V/2A Out
This is power supply adapter suitable for all denkovi 12VDC devices. Its AC plug may be changed, so please specify the type of the plug you want to use and we will send it with this AC plug. We offer AC plugs for USA, UK, AUS and EU.
Price: $26.40 -

SUNNY DC Power Cable Spliter 1x3
A DC power cable spliter 1x3, suitable for all our products with power jack 2.1mm
Price: $7.10 -
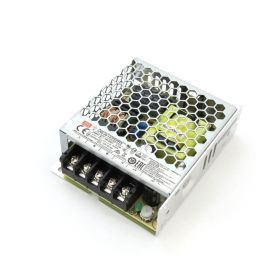
Mean Well LRS-35-12 Single Output Switching Power Supply 12V/3A Output
A 35W single-output enclosed type power supply with 30mm of low profile design. Input range is 85-264VAC, output is 12VDC / 3A. Suitable for all 12V Denkovi devices.
Price: $28.60


